If you can’t find wireless devices on your Windows 11 PC, try updating your network drivers through Device Manager or restarting your PC. Keeping your drivers up to date or performing a restart may resolve this issue and make your wireless devices visible.
Struggling to locate wireless devices on your Windows 11 PC can be frustrating. These devices are essential for connecting to the internet and other network resources. Fortunately, there are steps you can take to troubleshoot this problem. By following some simple techniques, you may be able to identify and resolve the issue.
This article will guide you through the necessary steps to help you successfully locate your wireless devices on your Windows 11 PC.
Common Reasons For ‘we Couldn’t Find Wireless Devices On This Pc’ Error
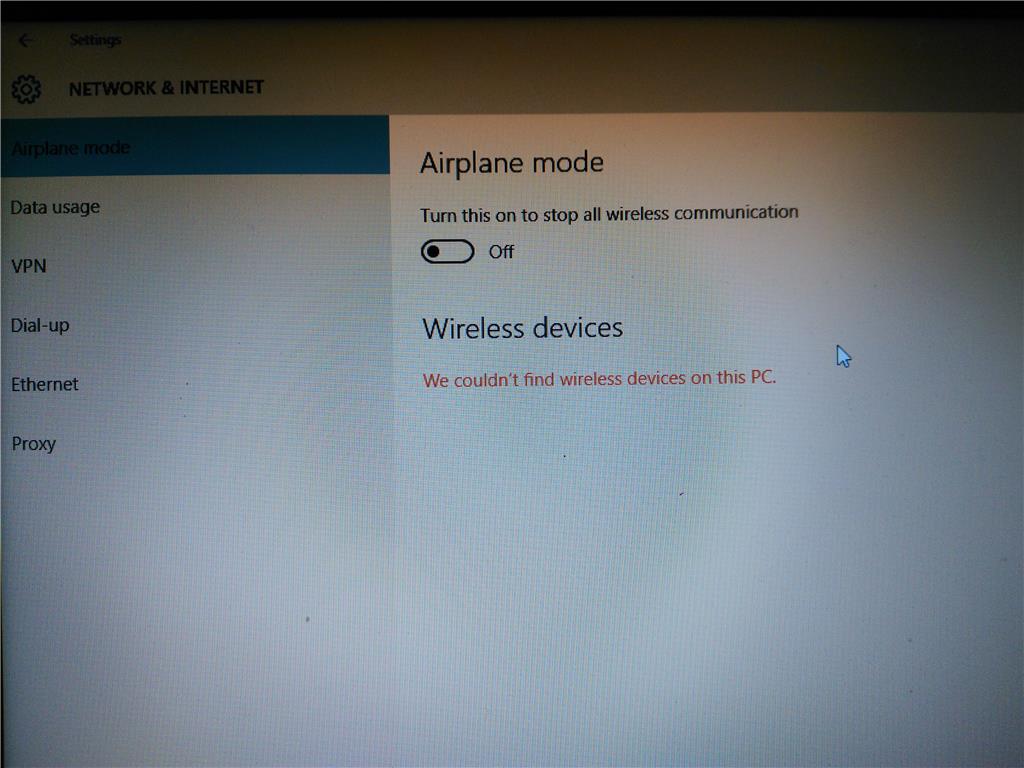
The error message “We Couldn’t Find Wireless Devices on This PC” can be frustrating when you’re trying to connect to a wireless network on Windows 11. There are several common reasons why this error may occur, ranging from outdated drivers to hardware issues. By understanding these common causes, you can troubleshoot and resolve the issue effectively.
Outdated Or Incompatible Wireless Drivers
Outdated or incompatible wireless drivers are a common cause of the “We Couldn’t Find Wireless Devices on This PC” error. Wireless drivers enable your device to communicate with wireless networks, and if they are outdated or incompatible, it can lead to connectivity issues. To resolve this, you can update the drivers through the Device Manager or the manufacturer’s website.
Disabled Wireless Adapter
Another common reason for the error is a disabled wireless adapter. The wireless adapter may have been disabled accidentally or due to a settings issue. To fix this problem, you can enable the wireless adapter through the Device Manager or the network settings in Windows 11.
Software Or Hardware Issues
Software or hardware issues within your device can also lead to the “We Couldn’t Find Wireless Devices on This PC” error. Malfunctioning hardware or conflicting software can disrupt the wireless connectivity. Troubleshooting software conflicts and performing hardware diagnostics can help identify and resolve these issues.

Credit: www.youtube.com
Troubleshooting Solutions For ‘we Couldn’t Find Wireless Devices On This Pc’ Error
When encountering the ‘We Couldn’t Find Wireless Devices on This PC’ error on Windows 11, it can be frustrating and inconvenient. However, there are several troubleshooting solutions that can help resolve this issue. In this guide, we will explore steps to address this error to get your wireless devices working again.
Update Wireless Drivers
If you’re experiencing the ‘We Couldn’t Find Wireless Devices on This PC’ error, it’s essential to ensure that your wireless drivers are up to date. Outdated drivers can cause connectivity issues and may trigger this error. To update your wireless drivers:
- Go to the Device Manager by typing “Device Manager” in the Windows search bar and pressing Enter.
- Expand the “Network adapters” section and locate your wireless network adapter.
- Right-click on the wireless adapter and select “Update driver.”
- Follow the on-screen instructions to complete the driver update process.
Enable Wireless Adapter
If the wireless adapter is disabled, it can result in the ‘We Couldn’t Find Wireless Devices on This PC’ error. To enable the wireless adapter:
- Press the Windows key + R to open the Run dialog box.
- Type “ncpa.cpl” and press Enter to open the Network Connections window.
- Right-click on the wireless adapter and select “Enable” from the context menu.
Check Wireless Adapter Hardware
Physically checking the wireless adapter hardware can help determine if there are any issues causing the error. Ensure that the wireless adapter is properly connected and that there are no visible physical damages. If using an external wireless adapter, try connecting it to a different USB port to rule out potential port issues.
Reset Network Settings
Resetting the network settings can help in resolving network-related errors, including the ‘We Couldn’t Find Wireless Devices on This PC’ error. To reset network settings:
- Open the Settings app and navigate to “Network & internet.”
- Scroll down and click on “Network reset.”
- Click on “Reset now” and follow the on-screen instructions to reset the network settings.
Solution 1: Update Wireless Drivers
To resolve the issue of ‘We Couldn’t Find Wireless Devices on This PC’ on Windows 11, one effective solution is to update the wireless drivers. This can be done by accessing the Device Manager and locating the wireless adapter, then selecting the option to update the drivers.
This simple process can often restore functionality to the wireless devices on the PC.
Check For Driver Updates Through Device Manager
If you couldn’t find wireless devices on your PC running Windows 11, it could be due to outdated or incompatible wireless drivers. To resolve this issue, you can start by checking for driver updates through the Device Manager. Here’s how you can do it:- Press the Windows key + X on your keyboard to open the Power user menu.
- Select Device Manager from the list of options.
- In the Device Manager window, expand the Network adapters category.
- Look for your wireless network adapter, it might be listed as Wi-Fi or something similar.
- Right-click on the wireless network adapter and select Update driver.
- Choose the option to search automatically for updated driver software.
- Windows will now search for the latest drivers for your wireless network adapter and install them if found.
Download And Install Updated Drivers From Manufacturer’s Website
If Windows couldn’t find any updates for your wireless drivers through Device Manager or if the updates didn’t fix the issue, you can try downloading and installing the updated drivers directly from the manufacturer’s website. Follow these steps:- First, note down the make and model of your wireless network adapter. You can find this information in the Device Manager.
- Open your preferred web browser and visit the official website of your wireless network adapter’s manufacturer.
- Navigate to the support or download section of the website.
- Look for the drivers section and search for the appropriate drivers for your wireless network adapter based on its make and model.
- Once you find the correct drivers, download them to your computer.
- After the download is complete, run the installer and follow the on-screen instructions to install the updated drivers.
- After the installation is finished, restart your computer and check if the wireless devices are now detected.
Use Driver Update Software
If manually updating the wireless drivers through Device Manager or the manufacturer’s website did not resolve the issue, you can try using driver update software to automate the process. Here’s what you can do:- Search for a reliable driver update software on trusted websites or download platforms.
- Download and install the driver update software on your computer.
- Launch the software and follow the provided instructions to scan for outdated or missing drivers.
- Once the scan is complete, the software will display a list of drivers that need to be updated.
- Select the wireless network adapter driver from the list and click on the update or install button.
- The software will now download and install the latest drivers for your wireless network adapter automatically.
- After the installation is finished, restart your computer and check if the issue is resolved.
Credit: answers.microsoft.com
Solution 2: Enable Wireless Adapter
To resolve the issue of not finding wireless devices on your PC running Windows 11, you can try enabling the wireless adapter. This can be done by accessing the Device Manager, locating the network adapters section, and enabling the wireless adapter if it’s disabled.
Enable Wireless Adapter Through Device Manager
If you are unable to find wireless devices on your PC running on Windows 11, one possible solution is to enable the wireless adapter through Device Manager. The wireless adapter is responsible for connecting your device to Wi-Fi networks. Here’s how you can enable it:- Press the Windows key + X on your keyboard and select “Device Manager” from the list of options.
- In the Device Manager window, look for the category labeled “Network adapters” and click on the small arrow next to it to expand the list.
- Locate your wireless adapter from the list of network adapters. It might be named something like “Wi-Fi” or “Wireless Network Connection.”
- Right-click on your wireless adapter and select “Enable” from the context menu that appears. This will activate the adapter and enable wireless connectivity on your PC.
- After enabling the wireless adapter, close the Device Manager window and try searching for wireless devices again. They should now be visible on your PC.
Check Physical Wireless Switch Or Function Keys
Another solution to the problem of not finding wireless devices on your Windows 11 PC is to check the physical wireless switch or function keys. Some laptops and desktops have physical switches or function keys dedicated to enabling or disabling wireless connectivity. Here’s what you can do:- Look for a physical switch on your laptop or desktop that controls Wi-Fi. It is usually located on the side or front of the device. Make sure the switch is in the “ON” position.
- Alternatively, check your keyboard for any function keys that have wireless icons on them, such as an antenna or signal bars. Press the appropriate function key, usually indicated by the wireless icon, to enable wireless connectivity.
- After ensuring the physical switch is on or pressing the correct function key, search for wireless devices on Windows 11 once again. You should now be able to detect wireless networks and devices.
Solution 3: Check Wireless Adapter Hardware
One common issue faced by Windows 11 users is the inability to find wireless devices on their computers. If you’ve experienced this problem, don’t worry! There are some straightforward solutions that can help you get your wireless adapter working again.
Ensure Wireless Adapter Is Properly Installed
The first step to troubleshoot the issue is to ensure that the wireless adapter is properly installed on your PC. To do this, follow these simple steps:
- Open the Device Manager on your Windows 11 PC. You can do this by right-clicking on the Start button and selecting “Device Manager” from the menu that appears.
- In the Device Manager window, expand the “Network adapters” category to see the list of installed network adapters.
- Look for your wireless adapter in the list. It should have a name like “Wi-Fi” or “Wireless Network Adapter.”
- If you see a yellow exclamation mark next to the wireless adapter, it indicates that there is an issue with the driver. In this case, right-click on the adapter and select “Update driver” to install the latest driver software.
- If the wireless adapter is not listed at all, it may not be properly connected to your PC. In this case, try removing and reinserting the adapter or consult the manufacturer’s instructions for installation.
Replace Faulty Wireless Adapter
If you have followed the above steps and still cannot find the wireless devices on your PC, it is possible that your wireless adapter is faulty and needs to be replaced. Here’s what you can do:
- Contact the manufacturer of your PC or the wireless adapter to inquire about warranty or replacement options.
- Before replacing the wireless adapter, make sure to completely uninstall any existing drivers for the adapter from your PC.
- Purchase a new wireless adapter that is compatible with your PC and install it according to the manufacturer’s instructions.
- Once the new adapter is installed, restart your PC and check if the wireless devices are now detected.
By following these steps, you should be able to resolve the issue of not finding wireless devices on your Windows 11 PC. Remember to ensure that your wireless adapter is properly installed and consider replacing it if necessary. Wireless connectivity will soon be restored, allowing you to fully enjoy all the benefits of a wireless connection on your PC.
Solution 4: Reset Network Settings
Resetting network settings can often resolve the issue of being unable to find wireless devices on Windows 11. This solution helps to refresh network configurations and improve connectivity, allowing you to easily connect to wireless devices on your PC.
If you’ve encountered the issue of not being able to find wireless devices on your PC running Windows 11, don’t worry – there is a solution. Resetting the network settings can often resolve this problem and get your wireless devices back up and running smoothly. In this section, we will guide you through the steps to reset your network settings in Windows Settings.Reset Network Settings In Windows Settings
To reset the network settings on your Windows 11 PC, follow these simple steps: 1. Open the Windows Settings on your PC. You can do this by clicking on the Start button and then clicking on the gear-shaped icon, which represents Settings. 2. In the Windows SettingsNetwork & Internet option. This will open the network settings menu. 3. Scroll down in the network settings menu and find the Advanced network settings section. Click on it to expand the options. 4. Within the advanced network settings, you will find the Network reset option. This is the option we need to select in order to reset the network settings on your PC. 5. Click on the Network reset option, and a confirmation window will appear, notifying you about the consequences of resetting your network settings. Read the notification carefully. 6. Once you have read and understood the notification, click on Reset now to initiate the network reset process. 7. Windows 11 will now proceed to reset your network settings. This may take a few minutes, so be patient and let the process complete. 8. After the network reset is complete, your PC will restart automatically. Upon restarting, check if you can now find wireless devices on your PC. Performing a network reset can often resolve issues related to wireless devices not being found on your PC. This process will remove all saved network connections, virtual private networks (VPNs), and related settings. However, it will not affect your personal files, apps, or documents. Remember that after performing a network reset, you will need to reconnect to your Wi-Fi network and set up any VPN connections again. Additionally, any custom network settings you had previously configured will need to be reestablished. By following these steps, you can easily reset the network settings on your Windows 11 PC and hopefully resolve the issue of not finding wireless devices.Additional Tips To Resolve Wireless Connection Issues
Experiencing wireless connection issues on Windows 11? Here are some additional tips to resolve the “We Couldn’t Find Wireless Devices on This PC” problem and ensure smooth connectivity.
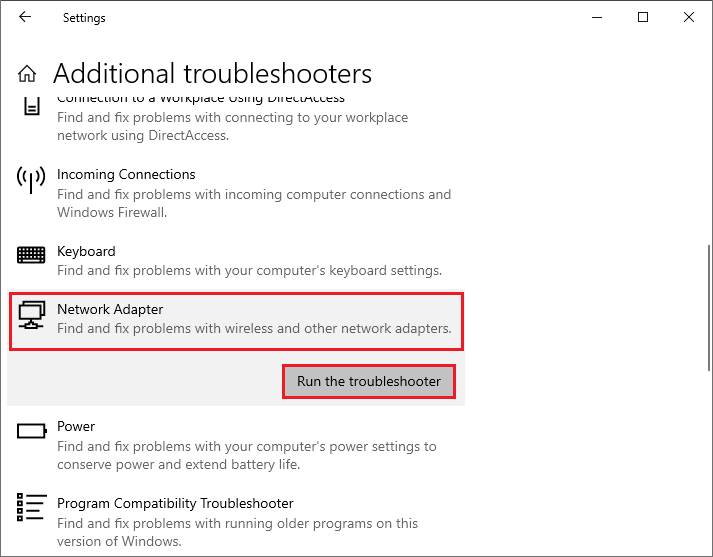
Additional Tips to Resolve Wireless Connection Issues Restart the Router and Modem If you encounter issues with wireless devices on your Windows 11 PC, restarting the router and modem can often resolve connectivity problems. Power off both devices, wait for 30 seconds, and then power them back on to establish a fresh connection. Check for Interference Interference from other electronic devices can disrupt wireless signals. Keep your router away from devices like cordless phones and microwave ovens. Additionally, consider repositioning your router to minimize interference and improve connectivity. Run Network Troubleshooter Windows 11 includes a built-in network troubleshooter that can automatically detect and resolve common wireless connectivity issues. To access it, navigate to Settings > Network & internet > Status > Network troubleshooter, and follow the on-screen instructions. Temporarily Disable Antivirus and Firewall Software Sometimes, antivirus and firewall software can mistakenly block wireless connections. Temporarily disable these software programs to determine if they are causing the issue. If the problem resolves after disabling them, consider reconfiguring your security software settings. These additional tips can help resolve wireless connection issues on Windows 11. By following these simple steps, you can improve your wireless connectivity and enjoy a seamless computing experience.
Credit: www.partitionwizard.com
Frequently Asked Questions Of We Couldnt Find Wireless Devices On This Pc On Windows 11
Why Can’t I Find Wireless Devices On My Windows 11 Pc?
If you’re unable to find wireless devices on your Windows 11 PC, it could be due to outdated drivers, a disabled wireless adapter, or a network connectivity issue. Try updating your drivers, enabling the wireless adapter, or troubleshooting your network connection to resolve the problem.
How Do I Enable Wireless Devices On Windows 11?
To enable wireless devices on Windows 11, go to Settings, select Network & Internet, then click on Wi-Fi. Ensure that the Wi-Fi switch is turned on. If it’s already on and you still can’t find wireless devices, try restarting your PC or updating the wireless adapter driver.
Why Are Wireless Devices Not Showing Up On My Windows 11 Pc?
If your wireless devices are not showing up on your Windows 11 PC, check if the devices are properly connected and powered on. Additionally, make sure your PC’s wireless adapter is enabled and functioning correctly. If the issue persists, try troubleshooting your network connection or updating your wireless adapter driver.
Conclusion
To sum up, the inability to locate wireless devices on Windows 11 can be a frustrating issue. However, by following the necessary troubleshooting steps mentioned in this blog post, you can overcome this problem. Remember to check your device’s drivers, restart the devices, and update the operating system.
By implementing these solutions, you’ll be able to connect wireless devices seamlessly on your Windows 11 PC and enjoy a smooth computing experience.