To speed up Windows 11 performance, tweak settings to optimize system resources and improve overall speed. Adjusting settings related to power, visual effects, and startup programs can make a noticeable difference in performance.
By following specific steps to customize these settings, you can enhance your Windows 11 experience and ensure smoother operation. Additionally, taking advantage of built-in performance tools and keeping your system updated can further contribute to maximizing speed and efficiency. Making these adjustments allows for a more responsive and productive computing environment.
Whether you use your device for work or entertainment, optimizing Windows 11 performance can lead to a more seamless and enjoyable user experience.
Optimizing Windows 11 Performance
Boost the performance of your Windows 11 by adjusting settings to optimize speed and efficiency, resulting in a smoother and faster user experience.
Windows 11 offers a sleek and modern user interface, but to ensure optimal performance, it’s essential to tweak certain settings for a smoother experience. By adjusting power settings, managing startup programs, and configuring visual effects, you can significantly enhance the overall performance of your Windows 11 system.Adjusting Power Settings
Windows 11 power settings can have a significant impact on the overall performance of your system. To optimize performance, adjust the power plan to ensure that your system doesn’t consume unnecessary resources. Navigate to the Control Panel, select “Power Options,” and choose the “High Performance” plan to prioritize system performance over energy conservation.Managing Startup Programs
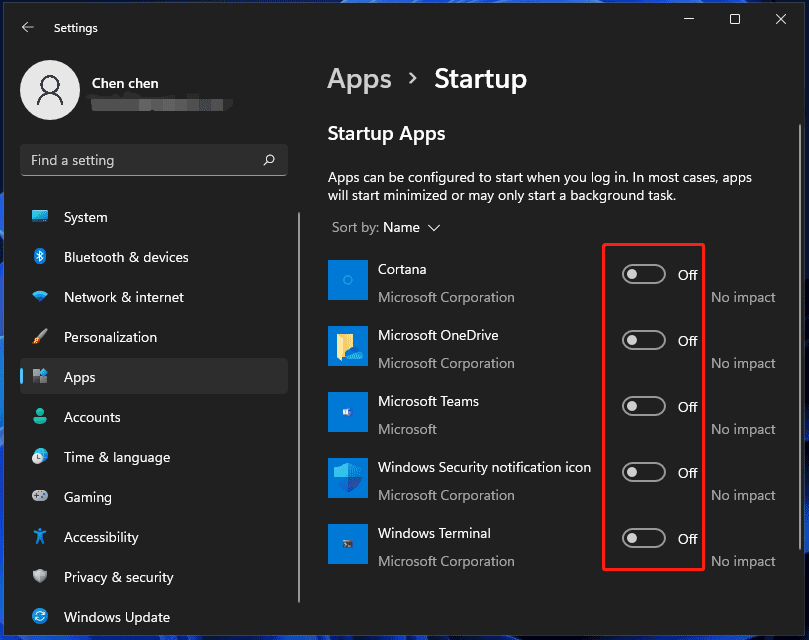
Unnecessary startup programs can slow down your system, impacting its overall performance. It’s crucial to manage these programs to ensure a speedy boot-up process and efficient system operation. To do this, open the Task Manager, navigate to the “Startup” tab, and disable any unnecessary programs that launch at startup.Configuring Visual Effects
Visual effects can consume system resources, affecting the overall performance of Windows 11. To enhance performance, consider configuring the visual effects settings. Navigate to the Control Panel, select “System,” and then click on “Advanced system settings.” Under the “Advanced” tab, click on “Settings” in the “Performance” section. Here, select the “Adjust for best performance” option to optimize visual effects for performance. By making these adjustments, you can ensure that your Windows 11 system operates smoothly and efficiently, delivering an enhanced user experience.Customizing Windows 11 Features
Customizing Windows 11 features can greatly enhance the overall performance of your system. By tweaking settings and accessing specific features, you can create a tailored experience that optimizes your PC and enhances your user experience.
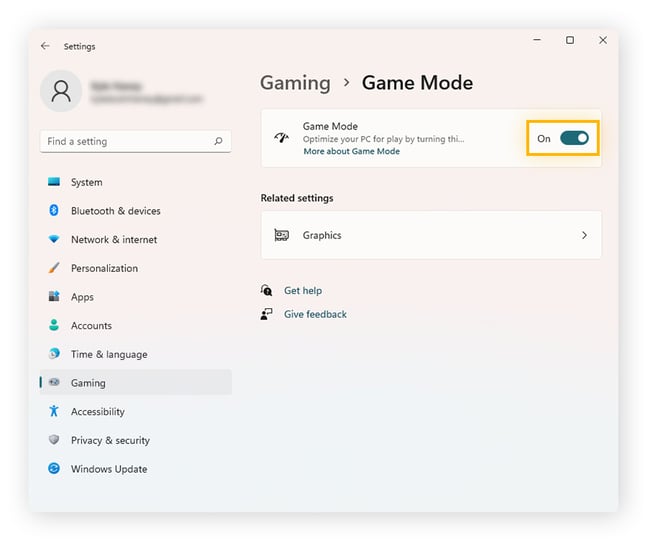
Enabling Game Mode
Enabling Game Mode can significantly boost your system’s performance when running games. To activate this feature, follow these simple steps:
- Press the Windows key + I to open the Settings menu.
- Click on “Gaming” and navigate to the “Game Mode” tab.
- Toggle the switch to the “On” position to enable Game Mode.
Disabling Background Apps
Disabling Background Apps allows you to reclaim valuable system resources. To disable unnecessary background apps, follow these steps:
- Go to Settings by pressing the Windows key + I.
- Click on “Privacy & Security” and select “Background apps.”
- Toggle off the apps that you don’t require to run in the background.
Managing Virtual Memory
Managing Virtual Memory can improve overall system performance. To customize your virtual memory settings, follow these steps:
- Right-click on “This PC” and select “Properties.”
- Click on “Advanced system settings” and navigate to the “Advanced” tab.
- Click on “Settings” under the “Performance” section, choose the “Advanced” tab, and click “Change” under Virtual Memory.
- Uncheck “Automatically manage paging file size for all drives” and select “Custom size.” Enter the initial and maximum size for your virtual memory.
- Click “Set” and then “OK” to apply the changes.
Updating Drivers And Apps
One of the key ways to improve the performance of your Windows 11 computer is by updating drivers and applications. Outdated drivers and apps can cause compatibility issues, system crashes, and sluggishness. In this post, we will explore how to update graphics drivers, keep Windows updated, and ensure all your applications are up to date. Implementing these tweaks can significantly speed up your Windows 11 performance.
Updating your graphics drivers is essential for optimal performance in Windows 11. Graphics drivers allow your computer’s graphics card to communicate with the operating system and software applications. Outdated drivers can result in poor graphics rendering, slow performance, and even system instability. To update your graphics drivers, follow these steps:
- Identify the make and model of your graphics card. You can find this information in the Device Manager or by visiting the manufacturer’s website.
- Visit the manufacturer’s website and search for the latest drivers for your specific graphics card model.
- Download the latest drivers and follow the installation instructions provided by the manufacturer.
- After the installation is complete, restart your computer to apply the changes.
Regularly updating your Windows 11 operating system is crucial for performance optimization and security. Microsoft releases updates that contain bug fixes, stability improvements, and new features. To keep your Windows 11 system up to date, follow these simple steps:
- Click on the Start menu and select “Settings”.
- In the Settings window, click on “Windows Update”.
- Click on “Check for updates” to search for the latest updates available for your system.
- If updates are found, click on “Install” to begin the update process.
- Restart your computer when prompted to complete the update installation.
In addition to updating your graphics drivers and Windows operating system, it is essential to keep all your applications up to date. Developers frequently release updates that address performance issues, add new features, and enhance compatibility. To update your applications, follow these steps:
- Open the application you want to update.
- Look for a “Check for updates” option within the application’s menu or settings.
- If updates are available, follow the prompts to download and install them.
- Alternatively, you can visit the official website of the application’s developer to manually download and install the latest version.
By regularly updating drivers and applications, you can ensure that your Windows 11 system is running smoothly and efficiently. Taking the time to perform these simple but crucial steps can go a long way in optimizing your computer’s performance.
Credit: www.avg.com
Cleaning Up Disk Space
When it comes to optimizing the performance of your Windows 11 PC, one often overlooked area is cleaning up disk space. Over time, unnecessary files and unused programs can accumulate on your hard drive, slowing down your system. By running disk cleanup, removing unnecessary files, and uninstalling unused programs, you can free up valuable disk space and improve the overall performance of your Windows 11 PC.
Running Disk Cleanup
One of the simplest and most effective ways to clean up disk space on your Windows 11 PC is by running the built-in Disk Cleanup tool. This tool helps you identify and remove various types of unnecessary files that are taking up valuable space on your hard drive, such as temporary files, system logs, and old Windows updates. To run Disk Cleanup:
- Open the Start menu and type “Disk Cleanup” in the search bar.
- Select the “Disk Cleanup” app from the search results.
- Once the Disk Cleanup dialogue box appears, select the drive you want to clean (usually the C: drive).
- Click on “OK” to start the scanning process.
- After the scan is complete, you’ll be presented with a list of files that can be safely removed.
- Select the types of files you want to delete and click on “OK”.
- Confirm the deletion by clicking on “Delete Files”.
Removing Unnecessary Files
In addition to using Disk Cleanup, it’s also important to manually remove unnecessary files that may be taking up space on your hard drive. These files can include old downloads, unused software installers, and large media files that you no longer need. To remove unnecessary files:
- Open Windows Explorer by pressing the Windows key + E.
- Navigate to the folders where the unnecessary files are located, such as the Downloads or Documents folder.
- Select the files you want to delete by clicking on them while holding down the Ctrl key.
- Right-click on the selected files and choose “Delete” from the context menu.
- Alternatively, you can drag the files to the Recycle Bin and then empty the Recycle Bin to permanently delete the files.
Uninstalling Unused Programs
Another way to free up disk space and optimize your Windows 11 PC is by uninstalling any unused programs. Over time, you may have installed various applications that you no longer use or need. These programs not only take up valuable disk space but can also run background processes that can slow down your system. To uninstall unused programs:
- Open the Start menu and click on “Settings”.
- In the Settings window, click on “Apps”.
- In the Apps & features section, you’ll see a list of all installed programs on your PC.
- Scroll through the list and identify the programs that you want to uninstall.
- Click on the program and then click on “Uninstall”.
- Follow the on-screen prompts to complete the uninstallation process.
Optimizing Windows 11 Storage
One of the most effective ways to improve the performance of your Windows 11 system is by optimizing its storage. By making a few simple tweaks and adjustments, you can ensure that your system runs smoothly and efficiently. In this article, we will explore three key methods for optimizing the storage on your Windows 11 device: Using Storage Sense, Moving Files to External Drives, and Disabling File Indexing.
Using Storage Sense
Storage Sense is a handy feature in Windows 11 that automatically frees up space on your device by deleting temporary and unnecessary files. To enable Storage Sense:
- Open the Settings app by pressing
Win + I. - Select “System” and then click on “Storage” in the left sidebar.
- Toggle the switch next to “Storage Sense” to enable it.
Once enabled, Storage Sense will automatically run in the background and delete unnecessary files, freeing up valuable storage space on your Windows 11 device.
Moving Files To External Drives
If you find that your device is running out of storage space, consider moving files to external drives. This can help to free up space on your Windows 11 device, allowing it to run more smoothly. To move files to an external drive:
- Connect your external drive to your Windows 11 device.
- Open File Explorer by pressing
Win + E. - Locate the files or folders you want to move, right-click on them, and select “Cut”.
- Open the external drive in File Explorer and paste the files or folders.
Moving files to an external drive not only frees up space on your Windows 11 device but also allows for easy access to your files from any device with the external drive connected.
Disabling File Indexing
File indexing is a feature in Windows 11 that allows for faster file searching. However, it can take up valuable system resources and impact system performance. To disable file indexing:
- Open File Explorer by pressing
Win + E. - Right-click on the drive you want to disable indexing for and select “Properties”.
- In the General tab, uncheck the box next to “Allow files on this drive to have contents indexed.”
- Click “Apply” and then select “Apply changes to drive, subfolders, and files” when prompted.
By disabling file indexing, you can improve the performance of your Windows 11 device, especially when dealing with large numbers of files.
Credit: www.minitool.com

Credit: www.windowscentral.com
Frequently Asked Questions On Speed Up Windows 11 Performance By Tweaking Settings
How Can I Speed Up Windows 11 Performance?
To speed up Windows 11 performance, you can tweak settings by disabling unnecessary startup programs, optimizing visual effects, clearing temporary files, updating drivers, and performing regular system maintenance. These steps will help improve your computer’s speed and overall performance.
What Are The Recommended Settings To Optimize Windows 11 Performance?
To optimize Windows 11 performance, you should adjust the power settings to use the Balanced or High Performance plan, disable unnecessary visual effects, remove unnecessary apps from startup, enable hardware acceleration, and keep your system updated with the latest Windows updates and driver updates.
Does Disabling Unnecessary Services Improve Windows 11 Performance?
Yes, disabling unnecessary services can improve Windows 11 performance. By disabling unused services, you can free up system resources, reduce memory usage, and improve the overall responsiveness of your computer. However, it’s important to be cautious and only disable services that you are familiar with and know are not needed for your specific usage.
Conclusion
By implementing these simple tweaks and optimizations, you can significantly enhance the performance of your Windows 11 system. From disabling unnecessary startup programs to adjusting power settings and optimizing storage, there are several steps you can take to speed up your computer.
Remember to regularly update your drivers and keep your system clean from unnecessary files. With these practical tips, you’ll be enjoying a faster, more responsive Windows 11 experience in no time.