To show folder size in Windows 11, right-click the folder, select ‘Properties’, then check the ‘Size’ field. Want to know the size of a folder on your Windows 11 PC?
Understanding folder size can help you manage storage space efficiently, especially if you have limited disk space. Fortunately, Windows 11 provides a simple way to check folder size. By following a few quick steps, you can easily see the size of any folder on your computer.
In this guide, we’ll walk you through the process of viewing folder sizes in Windows 11, allowing you to stay organized and keep track of your storage usage. Let’s dive in and learn how to show folder size in Windows 11.
Credit: www.nextofwindows.com
Different Methods For Showing Folder Size
When managing files and folders on your Windows 11 computer, it’s crucial to stay organized by keeping track of their sizes. Understanding the different methods for showing folder sizes can help you efficiently manage your storage space. In this article, we will explore three distinct techniques, using the built-in features of Windows 11 as well as third-party software, to display the size of folders.
Using File Explorer
File Explorer provides a convenient way to view folder sizes without the need for third-party applications. To check the size of a particular folder:
- Open File Explorer.
- Navigate to the folder you want to check.
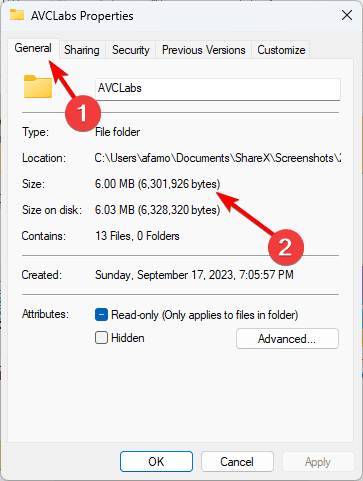
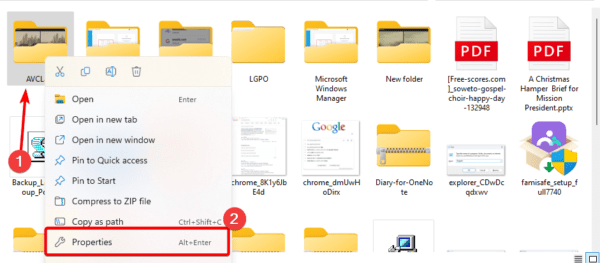
- Right-click on the folder and select “Properties” from the context menu.
- In the Properties window, you will find the size of the folder displayed under the General tab.
This method allows you to quickly obtain the size of a folder without any additional software, providing a seamless way to manage your files efficiently.
Using Command Prompt
For users who prefer a command-line interface, the Command Prompt in Windows 11 offers a simple way to obtain folder sizes:
- Open Command Prompt by searching for it in the Start menu.
- Navigate to the directory containing the folder you want to check using the “cd” command.
- Once inside the directory, type “dir /s” and press Enter.
- The command prompt will display a list of files and subdirectories along with their sizes, allowing you to identify the folder size.
This method is particularly useful for users comfortable with command-line operations, providing a quick and efficient way to retrieve folder sizes.
Using Third-party Software
Several third-party software options are available for displaying folder sizes with enhanced features and visual representations. Some popular choices include:
- TreeSize Free: Provides a detailed overview of folder sizes with customizable views and export options.
- WinDirStat: Offers a visual representation of disk usage, allowing users to identify large folders and files at a glance.
- Folder Size: Enables users to view folder sizes directly within File Explorer, integrating seamlessly with the Windows interface.
While these third-party options offer additional features, they may require installation and configuration, providing a more feature-rich approach to managing folder sizes on Windows 11.
Utilizing File Explorer To Display Folder Size
Utilizing File Explorer to Display Folder Size in Windows 11 is a convenient way to gain insight into the storage usage of various directories on your computer. By viewing folder properties and enabling the size column in details view, you can easily identify which folders are consuming the most space, allowing you to organize your files more efficiently.
Viewing Folder Properties
To begin displaying folder size in Windows 11, you can simply view the properties of the desired folder. Follow these steps:
- Open File Explorer by pressing Windows Key + E or by clicking on the File Explorer icon on the taskbar.
- Navigate to the folder you want to check the size of.
- Right-click on the folder and select Properties.
Within the folder properties window, you will find helpful information about the size of the folder, including the size on disk and the number of files and subfolders it contains. This method provides a quick and easy way to get a general idea of the storage usage of a particular directory.
Enabling Size Column In Details View
If you prefer a more detailed view of folder sizes, you can enable the size column in the details view of File Explorer. This will allow you to see the size of each folder directly in the File Explorer window. To do so, follow these steps:
- Open File Explorer by pressing Windows Key + E or by clicking on the File Explorer icon on the taskbar.
- Navigate to the folder you want to display the sizes of.
- In the File Explorer menu, click on the View tab.
- Locate the Add columns section and click on the Size checkbox.
Once you’ve enabled the size column, the file sizes will be displayed in the details view of File Explorer. This allows you to easily sort the folders by size, helping you identify the largest ones and prioritize your disk space management efforts.
Employing Command Prompt To Determine Folder Size
Discovering the size of a folder in Windows 11 can be achieved using Command Prompt. By executing a simple command, you can quickly ascertain the total size of a folder, saving you time and effort in managing your files efficiently.
When it comes to understanding the storage consumption of your Windows 11 folders, the Command Prompt can be a powerful tool. By leveraging a few simple commands, you can efficiently determine the size of a folder and all the files contained within it. In this blog post, we will explore how to employ the Command Prompt to calculate the size of a folder on your Windows 11 system.
Using ‘dir’ Command With Parameters
The ‘dir’ command is a fundamental command in Command Prompt that lists the contents of a directory or folder. When combined with specific parameters, it becomes a versatile tool to determine the size of a folder. Let’s dive into the different parameters that can be utilized with the ‘dir’ command:
- /s: This parameter displays the size of the specified folder and all its subfolders.
- /a: With this parameter, the ‘dir’ command will display hidden files and folders as well.
- /w: Using this parameter arranges the output in a wide format for better readability.
- /b: This parameter displays the bare format of the output, showing only the file and folder names.
Calculating Size Of All Files In A Directory
To determine the size of all the files within a specific directory, you can combine the ‘dir’ command with the ‘find’ command. Here’s how:
- Navigate to the directory for which you want to calculate the size using the ‘cd’ command.
Example: cd C:\Documents\FolderName - Once you are within the desired directory, enter the following command:
dir /s | find “File(s)” - The Command Prompt will display the total number of files found and the cumulative size of all the files.
With these simple steps, you can effortlessly determine the size of folders and all the files they contain on your Windows 11 system using the Command Prompt. This method allows you to gain valuable insights into your storage consumption and helps you manage your files efficiently. Whether you are a tech enthusiast or a professional, being able to employ the Command Prompt effectively can greatly enhance your productivity.
:max_bytes(150000):strip_icc()/LocationMove-7dafa46d6b574dbf9e78be8e945720b8.jpg)
Credit: www.lifewire.com
Exploring Third-party Software Options
When it comes to managing your files and folders in Windows 11, one important aspect to consider is the size of each folder. Knowing the size of a folder can help you identify large files or folders that are taking up unnecessary space on your computer’s hard drive. While Windows 11 does not provide a built-in feature to display folder sizes, there are third-party software options available that can help you accomplish this task. In this article, we will explore the benefits of using dedicated software and guide you through the process of installing and using disk space analyzer tools.
Installing And Using Disk Space Analyzer Tools
A disk space analyzer tool is designed to scan your computer’s hard drive and provide detailed information about the size of individual folders. This can be incredibly helpful in identifying large files or folders that may be consuming a significant amount of valuable storage space. Installing and using such tools is a straightforward process. Simply follow these steps:
- Research and choose a disk space analyzer tool that suits your needs. There are various options available, both free and paid.
- Visit the website of your chosen tool and download the installation file.
- Once the download is complete, double-click on the file to start the installation process.
- Follow the on-screen prompts to complete the installation. Make sure to review any additional options or settings that may be available.
- Once the installation is complete, launch the disk space analyzer tool.
- Select the drive or folder you want to analyze and click on the “Scan” or equivalent button.
- Wait for the tool to scan your selected drive or folder. This process may take some time depending on the size of the data.
- After the scan is complete, the tool will present a detailed report showing the size of each folder and file.
Benefits Of Using Dedicated Software
Using dedicated software to show folder size in Windows 11 offers several benefits:
- Efficiency: Dedicated software is specifically designed to analyze disk space, enabling faster and more accurate results compared to manual methods.
- Visibility: With dedicated software, you can easily visualize the size of each folder, making it simpler to identify large files or folders that need attention.
- Customization: Many disk space analyzer tools provide additional features and options for organizing and managing your files, giving you greater flexibility and control.
- Productivity: By efficiently managing your disk space, you can optimize your computer’s performance, saving time and enhancing productivity.
- Error Prevention: Being aware of folder sizes can help prevent issues such as running out of storage space or encountering slowdowns due to excessive file accumulation.
By exploring third-party software options and harnessing the power of dedicated disk space analyzer tools, you can gain valuable insights into folder sizes in Windows 11, enabling more efficient management of your files and improving overall system performance.
Customizing Folder Size Display Preferences
When it comes to optimizing your file management experience, customizing folder size display preferences in Windows 11 can be a game-changer. By adjusting the size units and format, as well as sorting and filtering folders by size, you can easily find and organize your files based on their size. Let’s explore these customization options in more detail.
Adjusting Size Units And Format
If you’re dealing with folders that contain many files of varying sizes, it can be helpful to adjust the size units and format displayed in Windows 11. By default, Windows displays file sizes in bytes, which can be difficult to comprehend at a glance. However, you can easily change this by following these simple steps:
- Open File Explorer by pressing the Windows key + E.
- In the File Explorer window, click on the “View” tab located at the top.
- Next, click on the “Options” button, then select “Change folder and search options.”
- A “Folder Options” window will appear. Navigate to the “View” tab within this window.
- Scroll down and locate the “Display file size information in…” section.
- Choose your desired size unit, such as kilobytes (KB) or megabytes (MB), from the dropdown menu.
- Click on the “OK” button to save your changes.
By adjusting the size units and format, you can make file sizes more easily digestible, allowing for quicker identification of large or small files within your folders.
Sorting And Filtering Folders By Size
In addition to adjusting size units, Windows 11 also provides the option to sort and filter folders based on their size. This allows you to quickly locate folders that take up the most space on your computer, making it easier to identify areas for potential cleanup or optimization. Follow these steps to sort and filter folders by size:
- In File Explorer, navigate to the folder you want to sort.
- Click on the “Size” column header to sort the folders in ascending or descending order based on their size.
- If you want to filter folders by a specific size range, click on the “Filter” button located in the “Sort and filter” section of the “View” tab.
- Select the desired size range from the dropdown menu or define a custom range by clicking on the “Size” option again.
By sorting and filtering folders by size, you can easily identify which folders are taking up the most space on your computer, helping you efficiently manage your files and storage.
:max_bytes(150000):strip_icc()/DownloadsProperties-5bf995db9b764ffe9c57e79d416f96bc.jpg)
Credit: www.lifewire.com
Frequently Asked Questions Of Show Folder Size In Windows 11
How Can I Show Folder Size In Windows 11?
To check the size of a folder in Windows 11, right-click on the folder, select ‘Properties,’ and navigate to the ‘General’ tab. Here, you will find the folder size along with other details like the number of files and subfolders it contains.
You can also use third-party software, such as WinDirStat, to visualize the folder size in a more detailed manner.
Why Is The Folder Size Not Showing In Windows 11?
If the folder size is not showing in Windows 11, it could be due to the folder properties being set to ‘Hide protected operating system files. ‘ To fix this, open File Explorer, click on ‘View’ in the toolbar, and make sure ‘Hidden items’ and ‘File name extensions’ are checked.
Then, right-click on the folder, go to ‘Properties,’ and check the folder size under the ‘General’ tab.
What Is The Importance Of Knowing Folder Size In Windows 11?
Knowing the folder size in Windows 11 is vital for managing disk space efficiently. By understanding the size of folders, you can identify which folders are taking up the most space on your computer and take appropriate action to free up storage.
This knowledge also helps you plan for future storage needs and prevents your system from running out of disk space.
Conclusion
Windows 11 brings a much-needed feature to the table by allowing users to easily view the size of their folders. With just a few simple steps, you can quickly identify which folders are taking up valuable disk space. This function not only aids in organizing your files but also assists in optimizing your device’s performance.
Say goodbye to the hassle of manually checking folder sizes and embrace the efficiency of this new Windows 11 tool.