If Minecraft port forwarding isn’t working on Windows 11, check for firewall or antivirus interference. Ensure the correct port number is set in the router and the Minecraft server.
Are you encountering issues with Minecraft port forwarding on your Windows 11? Port forwarding allows external devices to connect to your Minecraft server. However, if it’s not working, it could be due to firewall or antivirus settings blocking the connection.
Another common issue is incorrectly setting the port number in your router and the Minecraft server. In this guide, we’ll cover the steps to troubleshoot and resolve Minecraft port forwarding issues on Windows 11, so you can get back to enjoying seamless gameplay.

Credit: www.amazon.com
What Is Minecraft Port Forwarding?
Minecraft port forwarding refers to the process of allowing an external connection to access your game server, which is crucial for hosting multiplayer games. However, many players encounter issues with port forwarding not working on Windows 11. To address this problem, it’s important to understand the concept and significance of port forwarding in the context of Minecraft.
The Concept Of Port Forwarding
Port forwarding is a network technique that enables an external device to connect to a specific service or application on your local network. In the case of Minecraft, port forwarding allows players from different locations to join a server hosted on your computer.
Importance Of Port Forwarding In Minecraft
The seamless functionality of port forwarding is essential for enabling multiplayer mode in Minecraft. By properly configuring port forwarding, players can connect to a designated server and engage in collaborative gameplay, creating a dynamic and immersive gaming experience.
Understanding Windows 11 Issues
Common Issues With Windows 11
Many users have reported encountering various issues with Minecraft port forwarding on Windows 11. Some common problems include connectivity issues, network configuration conflicts, and firewall restrictions. These issues can prevent players from seamlessly accessing multiplayer features and game servers.
Impact Of Windows 11 On Minecraft Gameplay
Windows 11, with its new architecture and security features, can impact Minecraft gameplay, especially when it comes to network connectivity and port forwarding. Players may face challenges in setting up and troubleshooting port forwarding due to the changes in the way Windows 11 manages network connections and firewall settings.
Solutions For Minecraft Port Forwarding On Windows 11
Port forwarding is essential for optimizing your Minecraft gameplay experience by allowing other players to connect to your world. However, if you are facing issues with Minecraft port forwarding on Windows 11, there are several solutions you can try to resolve the problem. In this article, we will discuss the three most effective methods to get your Minecraft port forwarding working on Windows 11.
Check Router Settings
Firstly, ensure that your router is properly configured to forward the necessary ports for Minecraft. To do this, access your router’s settings by entering its IP address in your web browser. Once you are logged into the router’s interface, locate the port forwarding section. Here, you will need to create a new port forwarding rule for Minecraft, specifying the appropriate port range and protocol (usually TCP/UDP). Be sure to save the changes before proceeding.
Configure Windows Firewall
Windows Firewall can sometimes block incoming connections, including those for port forwarding. To resolve this, follow these steps:
- Open the Windows Security app by typing ‘Windows Security’ in the search bar.
- Click on ‘Firewall & network protection’ on the left-side menu.
- Choose ‘Allow an app through firewall’ and then click on ‘Change settings’.
- Scroll through the list of applications and locate ‘Minecraft’.
- Ensure that both the Public and Private checkboxes are ticked for Minecraft.
- Save the changes and restart your computer for the new settings to take effect.
Use Third-party Port Forwarding Software
If the above methods do not work, you can utilize third-party port forwarding software to ease the process. These software programs simplify the task of configuring port forwarding settings and offer additional features for an enhanced gaming experience. Examples of popular third-party port forwarding software include Hamachi, Evolve, and PortMapper. Simply download and install the software, and follow the provided instructions to set up port forwarding for Minecraft.
By following these solutions, you should be able to resolve any issues with Minecraft port forwarding on Windows 11 and enjoy a smooth multiplayer experience. Remember to save the router settings, configure Windows Firewall properly, or utilize third-party software if necessary. Happy gaming!
Step-by-step Guide For Minecraft Port Forwarding On Windows 11
If you’re having trouble with Minecraft port forwarding on Windows 11, don’t worry, we’ve got you covered! This step-by-step guide will help you set up port forwarding for Minecraft on your Windows 11 computer, ensuring smooth and hassle-free gameplay. Let’s get started!
Identify Your Router Model
The first step in setting up port forwarding for Minecraft is to identify your router model. Each router has a different interface and settings page, so it’s important to know which model you’re working with. To find out your router model, you can check the back or bottom of your router for a label or sticker that indicates the brand and model number.
Access Router Settings
Once you’ve identified your router model, the next step is to access its settings page. To do this, open a web browser on your Windows 11 computer and enter the default IP address of your router in the address bar. The default IP address varies depending on the router brand, but it is commonly 192.168.1.1 or 192.168.0.1. Press Enter to access the router login page.
Set Up Port Forwarding
After accessing the router settings page, you need to navigate to the port forwarding section. The location of this section may vary depending on your router’s interface. Look for terms like “Port Forwarding,” “Virtual Server,” or “Applications & Gaming.” Once you’ve found the appropriate section, follow these steps:
- Click on “Add” or “Create New” to create a new port forwarding rule.
- Enter a name for the rule, such as “Minecraft Port Forwarding.”
- Specify the port range for Minecraft. Typically, the port range is 25565-25565 for both TCP and UDP protocols.
- Enter the IP address of your Windows 11 computer. You can find your IP address by typing “ipconfig” in the Command Prompt and looking for the IPv4 address under the network adapter you’re using.
- Select the protocol (TCP, UDP, or both) for the port forwarding rule.
- Save the changes and exit the router settings page.
Test The Connection
Once you’ve set up the port forwarding rule for Minecraft, it’s essential to test the connection to ensure everything is working correctly. To do this, follow these steps:
- Open Minecraft on your Windows 11 computer.
- Start or join a multiplayer game using your server’s IP address and port (e.g., 192.168.1.101:25565).
- If you can successfully connect to the Minecraft server and play without any issues, then congratulations! Your port forwarding setup is working correctly. However, if you’re unable to connect or experience any problems, double-check the port forwarding settings and repeat the process if necessary.
By following this step-by-step guide, you should now have a better understanding of how to set up Minecraft port forwarding on Windows 11. Enjoy a seamless multiplayer gaming experience with your friends and explore the vast world of Minecraft!
Additional Tips And Troubleshooting
If you’re experiencing issues with Minecraft port forwarding not working on Windows 11, here are some additional tips and troubleshooting steps to resolve the problem. These tips can help you troubleshoot any connectivity issues and ensure that your Minecraft server is accessible to other players.
Using A Static Ip Address
If you’re experiencing issues with Minecraft port forwarding on Windows 11, trying a static IP address might resolve the problem. A static IP address ensures that your computer always uses the same IP address, which can be helpful for port forwarding. Here’s how you can set up a static IP address:- Press the Windows key and type
Network Status. Click on the Network Status setting. - In the Network & Internet settings, click on Change Adapter Options under the Advanced network settings section.
- Right-click on your active network connection and select Properties.
- In the Properties window, scroll down and find the Internet Protocol Version 4 (TCP/IPv4) option. Select it and click on Properties.
- In the Internet Protocol Version 4 (TCP/IPv4) Properties window, select the Use the following IP address option.
- Enter a static IP address that is within the same subnet as your router. The Subnet mask and Default gateway should match your router’s settings. You can obtain these details from your router’s configuration page.
- Click on OK to save the changes.
Checking Java Version
Another potential cause for Minecraft port forwarding issues on Windows 11 is an outdated or incompatible Java version. Minecraft relies on Java to run, so it’s important to ensure that you have the correct version installed. Here’s how you can check and update your Java version:- Press the Windows key and type
Control Panel. Click on the Control Panel app. - In the Control Panel, search for Java and click on Java (32-bit) (or Java (64-bit) if you have a 64-bit Windows installation).
- In the Java Control Panel, click on the Java tab.
- Click on the View button under the Java Runtime Environment section.
- Check the installed version of Java. If it’s not up to date, visit the official Java website and download the latest version.
- Install the latest version of Java and restart your computer.
Dealing With Conflicting Software
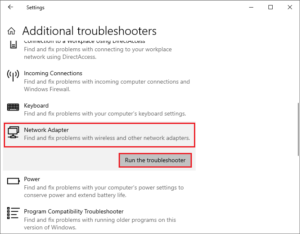
Sometimes, conflicting software on your computer can interfere with Minecraft port forwarding. These conflicting programs might include firewalls, antivirus software, or other networking utilities. To troubleshoot this issue, follow these steps:- Temporarily disable your firewall and antivirus software to see if they are blocking the port forwarding. Refer to the software’s documentation for instructions on how to disable them.
- If disabling the firewall and antivirus software doesn’t solve the problem, try adding Minecraft to the list of allowed applications in your firewall and antivirus settings.
- If you have any other networking utilities or VPN software installed, temporarily disable or uninstall them to see if they are causing conflicts with Minecraft port forwarding.
- Restart your computer and test if the port forwarding is working now.
Seeking Professional Help
If you have tried all the above steps and are still experiencing issues with Minecraft port forwarding on Windows 11, it may be time to seek professional help. A network technician or IT professional can assist you in resolving any complex network configuration problems. Contact your internet service provider or a local computer repair service to seek assistance.
Credit: www.reddit.com

Credit: www.reddit.com
Frequently Asked Questions Of Minecraft Port Forwarding Not Working On Windows 11
Why Is My Minecraft Port Forwarding Not Working On Windows 11?
If your Minecraft port forwarding is not working on Windows 11, it could be due to firewall settings, router configuration, or an issue with the Minecraft server. Check your firewall settings, ensure the correct port is open on your router, and make sure the Minecraft server is set up correctly.
How Can I Fix Minecraft Port Forwarding Issues On Windows 11?
To fix Minecraft port forwarding issues on Windows 11, first, ensure that the correct port is open on your router. Then, check your firewall settings to ensure that Minecraft is allowed through. You can also try restarting your router and Minecraft server for troubleshooting purposes.
If all else fails, consider reaching out to your internet service provider for further assistance.
What Is Port Forwarding In Minecraft?
Port forwarding in Minecraft allows other players to connect to your Minecraft server by forwarding incoming connections from your router to your computer. It enables players outside of your local network to access your server and join your game. Port forwarding is necessary for hosting multiplayer games on Minecraft.
How Do I Forward Ports On Windows 11 For Minecraft?
To forward ports on Windows 11 for Minecraft, you need to access your router’s settings. Open a web browser and enter your router’s IP address. Locate the port forwarding section and add a new port forwarding rule for the Minecraft port (default is 25565).
Enter your computer’s IP address and save the settings.
Conclusion
To conclude, if you’re facing issues with Minecraft port forwarding on Windows 11, don’t fret. Start by double-checking your router settings and firewall permissions. Ensure that you’ve correctly entered the necessary port numbers and forwarded them to your device’s IP address.
Troubleshoot any potential conflicts with other applications using the same ports. And remember, patience is key as you go through the troubleshooting process. Happy gaming!