To run a hard drive test in BIOS, restart your computer and access the BIOS menu using the setup key displayed during boot. Navigate to the diagnostic tools section to initiate the hard drive test.
Ensuring the health of your hard drive is paramount for maintaining the performance and reliability of your computer. A hard drive test performed through the BIOS can provide early detection of potential issues, possibly preventing data loss or complete drive failure.
Running a diagnostic test before the operating system loads helps in identifying hardware faults without software interference. This proactive measure is a critical step in system maintenance for both individual users and IT professionals. It’s an essential process, especially for systems exhibiting performance issues or those that have been impacted by unexpected shutdowns or crashes.
Introduction To Bios Diagnostics
Understanding how to test your hard drive in the BIOS can save you from data loss. BIOS diagnostics are an essential first step in hardware troubleshooting. They come built-in on your computer’s motherboard. These diagnostics help identify issues before your operating system boots up.
The Role Of Bios
The BIOS, or Basic Input/Output System, is crucial for your computer’s startup process. It tests your hardware through a sequence known as Power-On Self-Test (POST). Hard drive testing within the BIOS checks for the integrity and connectivity of your storage device.
Identifying Hard Drive Problems Early
Early detection of hard drive issues can prevent system failures and data loss. The BIOS diagnostics tool can alert you to potential problems with your hard drive. Look for these signs:
- Long wait times during the boot process
- Unusual noises from the hard drive
- Repeated system crashes or freezes
Running a BIOS diagnostic test can help pinpoint these issues early on.

Credit: en.wikipedia.org
Accessing Bios Setup
Running a hard drive test in BIOS helps ensure your computer’s health. Accessing BIOS setup is the first step in this crucial process. Different computers have various methods to enter BIOS, but common keys include F2, F10, ESC, or DEL.
Restarting Your Computer
To access the BIOS setup, you must restart your computer. Click ‘Start,’ then ‘Power,’ and choose ‘Restart’. Ensure no unsaved work before restarting.
Navigating To Bios Settings
As the computer restarts, pay close attention to the screen. Look for a prompt that indicates which key to press to enter BIOS. Press it repeatedly until the BIOS menu appears.
- Press F2: Common for many PCs.
- Press DEL: Typically used for desktops.
- Press ESC or F10: Alternate options.
Once you’re in the BIOS settings, use the arrow keys to navigate. The specific menu for running a hard drive test may vary by manufacturer. Look for ‘Diagnostics’ or ‘System Health’. Select the option and follow on-screen instructions.
Locating The Hard Drive Test Utility
Knowing how to run a hard drive test in BIOS is essential for checking your computer’s health. The BIOS or UEFI firmware offers a built-in Hard Drive Test Utility for this purpose. This utility can help identify any potential issues with the hard drive before they become serious problems.
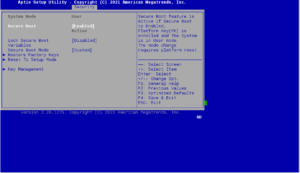
Different Bios Brands And Their Interfaces
Different computer manufacturers use various BIOS programs. Each of these has a unique way to navigate and locate tools. Here is what you might encounter:
- AMI BIOS: Usually blue or gray interface.
- Award BIOS: A classic interface with a top menu bar.
- Phoenix BIOS: Simple and often uses a horizontal menu.
- UEFI BIOS: Advanced, with a graphical interface and mouse support.
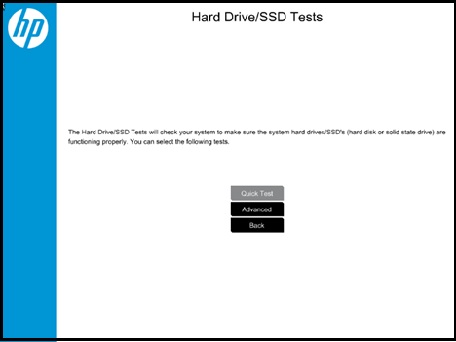
Finding The Hard Drive Testing Tool
Locate the hard drive testing tool in your BIOS by following these general steps:
- Restart your computer and press the key shown to enter BIOS (F2, Delete, F10, etc.).
- Use your keyboard’s arrow keys to navigate through the menus.
- Look for a tab labeled “Diagnostics” or “Tools”.
- Select the “Hard Drive Test” or “Self-Test” option.
The interface may differ, but the basic steps are similar for most computers. Performing a hard drive test helps keep your system’s storage reliable and secure.
Credit: support.hp.com
Running The Hard Drive Test
Running the Hard Drive Test is crucial for ensuring your computer’s storage health. This process allows you to troubleshoot potential hardware issues and assess drive performance. Understanding how to execute this test in BIOS can save time and prevent data loss. Let’s dive into the step-by-step process.
Step-by-step Process
- Restart your computer and press the BIOS access key. This key varies by manufacturer but often is F2, F10, or Del.
- In BIOS, navigate using your keyboard arrows to the Tools or Diagnostic menu.
- Select the option labeled Hard Drive Test or Primary Hard Disk Self Test.
- Start the test and wait. The process may take time depending on the drive’s size.
- Once complete, take note of any messages or error codes.
Interpreting Test Results
After the test completes, it is time to make sense of the results. BIOS will typically show a status that indicates the hard drive’s condition. Look out for these common indicators:
- Passed: Your hard drive is in good condition.
- Failed – Error Code: Your drive may have issues.
- Smart Check: Monitors drive attributes over time.
- Short DST: A quick test of drive integrity.
Record any error codes and consult your manufacturer’s website or manual for specifics. A passed status means your hard drive is healthy, while a failed status indicates potential hardware failure. Immediate attention from a professional may be necessary.
After The Hard Drive Test
Imagine finishing a hard drive test through your computer’s BIOS. You hold your breath as you wait for the results. Now, the test concludes. What’s next? The information you see here is crucial. It tells whether your hard drive is healthy or may soon fail. Understanding these signals can save your data.
Responding To Failure Messages
The test is done, and the screen flashes with a failure message. Don’t panic. First, write down the provided error code. This code is key to understanding the problem. Knowing this code helps you find precise fixes. Let’s review the usual steps following a failure message:
- Record the error code – Keep it for reference.
- Check the manual – It often lists common error codes and meanings.
- Visit the drive manufacturer’s website – Search for your specific error code.
Possible Fixes And Next Steps
With the error code in hand, you’re ready for action. There are many potential fixes. Here, we explore common ones:
- Re-seat the drive – Sometimes, a poor connection causes errors. Unplug and reconnect the drive.
- Run software-based diagnostics – Use tools like CHKDSK for a deeper analysis.
- Check for firmware updates – Manufacturers might release fixes that improve drive performance.
- Backup data – If a drive is failing, save your data to another location immediately.
Should these steps not resolve the issue, further help might be needed. Depending on your warranty, consider contacting support. If all fails, a new drive could be necessary. Don’t delay in taking action to protect your data and system.
Preventive Measures And Best Practices
Ensuring that your hard drive runs smoothly is crucial to your computer’s performance. Before diving into how to run tests in BIOS, let’s explore routine preventive measures and best practices. These tips and insights help maintain your hard drive’s health and longevity.
Regular Maintenance Tips
Regular maintenance keeps your hard drive in good shape. Below are key actions you should take:
- Keep your system clean: Dust and debris affect performance. Clean your device regularly.
- Run disk cleanup: Remove unnecessary files. It frees up space and enhances speed.
- Defragment your disk: This reorganizes data and improves access times.
- Update software: Keep your OS and drivers up-to-date for optimal performance.
- Back up data: Prevent data loss by creating regular backups.
Understanding Hard Drive Health Indicators
Being aware of health indicators can prevent failures. Below is how to understand them:
| Indicator | Meaning |
|---|---|
| SMART Status | Self-monitoring analysis reporting technology identifies risks. |
| Noise | Unusual sounds may indicate mechanical issues. |
| Error Messages | Persistent errors could signal hardware problems. |
| Speed | Slow performance might be a sign of imminent failure. |
Monitoring these indicators can help you take timely preventive action.

Credit: en.wikipedia.org
Frequently Asked Questions Of How To Run A Hard Drive Test In Bios
How Do I Run A Hard Drive Test?
To run a hard drive test, use your operating system’s built-in tools, like Windows Disk Check or Mac’s Disk Utility. Alternatively, download and launch a dedicated hard drive testing software from the drive manufacturer. Follow prompts to begin the diagnostic process.
How Do I Check Hard Drive Space In Bios?
To check hard drive space in BIOS, restart your computer and press the key to enter BIOS (commonly F2, F10, DEL, or ESC). Look for a section labeled ‘Storage,’ ‘System Configuration,’ or ‘Drive Information’ to find hard drive space details.
How Do I Check My Ssd And Hdd In Bios?
To check your SSD or HDD in BIOS, restart your computer and press the key to enter BIOS (commonly F2, F10, DEL, or ESC). Navigate to the ‘Boot’ or ‘Storage’ tab to see a list of connected drives.
How To Troubleshoot Hard Drive In Bios?
To troubleshoot a hard drive in BIOS, restart your computer and tap the key to enter BIOS setup, often F2 or Delete. Navigate to the Boot or Storage tab and check if your hard drive is listed. If not, ensure it’s properly connected and receiving power.
Conclusion
Running a hard drive test in BIOS is simpler than you may think. This straightforward process can save data and prevent issues. Remember to backup files, follow the steps outlined, and address any errors immediately. Equip yourself with this knowledge to guard your computer’s heart – its hard drive.
Stay proactive in your PC’s health checks!