To open a Samsung remote, remove the battery cover by sliding it downwards. Then, use a small tool to pry open the remote.
A Samsung remote control can occasionally need maintenance, such as replacing batteries or cleaning the internal components. Knowing how to properly open your remote can save you time and extend the life of your device. It’s a straightforward process that requires minimal tools and effort.
Whether you’re troubleshooting or performing routine maintenance, understanding the steps to open your Samsung remote ensures you can keep it functioning optimally. Proper care and timely maintenance can enhance the longevity and performance of your remote, contributing to a seamless user experience.

Credit: www.ifixit.com
Tools You’ll Need
Opening a Samsung remote can be simple with the right tools. Here is a list of what you’ll need to get started.
Basic Tools
These tools are essential for opening a Samsung remote.
- Small Phillips Screwdriver: This helps in removing screws.
- Plastic Pry Tool: This tool prevents damage to the remote.
- Soft Cloth: Useful for cleaning parts.
Optional Tools
These tools can make the process easier but are not necessary.
- Magnifying Glass: Helps in seeing small screws.
- Tweezers: Useful for handling tiny parts.
- Compressed Air: Cleans out dust from the remote.
Credit: m.youtube.com
Preparation Steps
Before opening a Samsung remote, you need to prepare properly. This ensures safety and efficiency. Follow these steps to get started.
Safety Precautions
Safety is the most important thing. Follow these precautions:
- Wash your hands before starting.
- Keep the remote away from water.
- Use tools with care.
- Don’t force the remote open.
Work Area Setup
Setting up a good work area is also important. Here’s how to do it:
- Find a clean, flat surface.
- Gather all the tools you will need.
- Make sure you have good lighting.
- Keep a small container for screws.
These steps will help you open the Samsung remote safely. Follow them to avoid any issues.
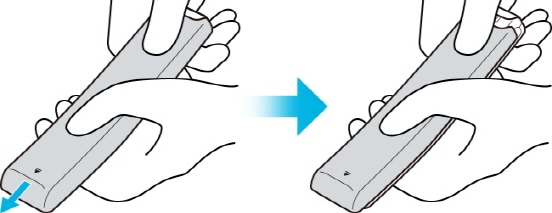
Removing The Battery Cover
Removing the battery cover from your Samsung remote is easy. This guide will show you the steps.
Locating The Battery Cover
The battery cover is usually on the back of the remote. Look for a small panel with a grip. It is often at the bottom end of the remote.
Using The Right Technique
To remove the battery cover, follow these simple steps:
- Hold the remote with the buttons facing down.
- Place your thumb on the grip of the battery cover.
- Apply gentle pressure and slide the cover towards the bottom.
If the cover is stuck, do not force it. Use a soft cloth to improve grip. Try again with a steady push.
| Step | Description |
|---|---|
| 1 | Hold the remote buttons down |
| 2 | Place thumb on the grip |
| 3 | Slide the cover towards the bottom |
Now, you have removed the battery cover. You can replace the batteries easily.
Credit: www.samsung.com
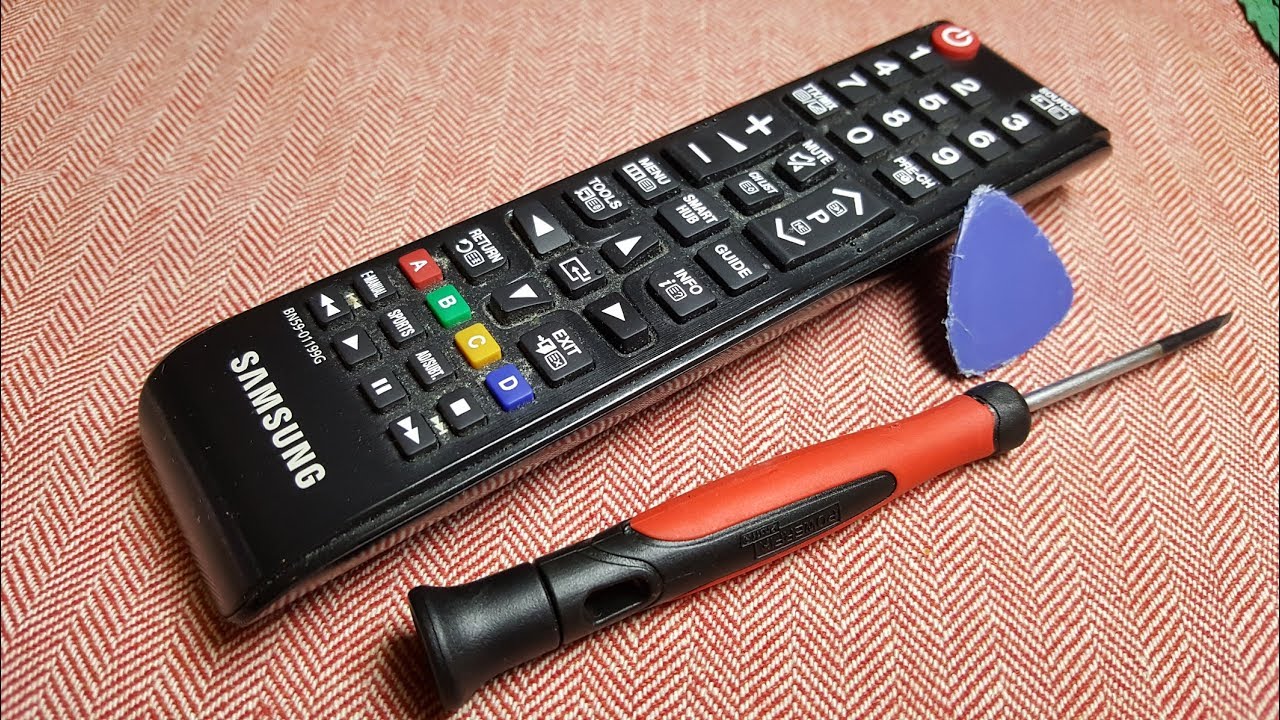
Accessing The Screws
Opening a Samsung remote can seem tricky. Accessing the screws is the first step. Let’s break down the process into simple steps.
Identifying Screw Locations
First, you need to find the screws. Look at the back of the remote. You will often see small circles. These circles are where screws hide. Some remotes have screws under the battery cover. Remove the batteries to check.
| Remote Model | Screw Location |
|---|---|
| Samsung BN59 | Under battery cover |
| Samsung TM1240A | Back panel corners |
Choosing The Right Screwdriver
Next, choose the right screwdriver. Most Samsung remotes use small Phillips screws. A Phillips #0 or #00 screwdriver works best. Flathead screwdrivers can damage the screws.
- Phillips #0
- Phillips #00
- Precision screwdriver set
Using the right tool makes the job easier. It also prevents damage to the screws and remote.
Separating The Remote Halves
Opening a Samsung remote can be tricky but is often necessary. You might need to change batteries or fix internal components. Follow these steps carefully to avoid any damage.
Prying The Edges
First, locate the seam where the two halves meet. This is usually around the sides of the remote. Use a plastic prying tool to gently insert into the seam.
Work your way around the edges, applying gentle pressure. Avoid using metal tools as they can scratch or damage the plastic. A guitar pick or a plastic card can also work well.
Once you have inserted the tool, gently twist to separate the halves. Move slowly to ensure you don’t break any clips inside the remote.
Avoiding Damage
To keep the remote in good condition, follow these tips:
- Do not force the halves apart.
- Use only plastic tools to avoid scratches.
- Work slowly and evenly around the edges.
If the remote feels stuck, check for hidden screws. Remove any visible screws before prying further. Sometimes screws are under the battery cover.
Once the halves are separated, you can access the internal components. Handle internal parts carefully to avoid damage. Clean any dust or debris inside with a soft brush.
Now you know how to safely open your Samsung remote. Follow these steps to ensure a damage-free process.
Inspecting Internal Components
After opening your Samsung remote, the next step is to inspect the internal components. This is crucial to ensure everything is in good working order. Let’s dive into the details of what to look for.
Identifying Key Components
The inside of a Samsung remote consists of several key components. Understanding these parts helps in troubleshooting. Here are the main components:
- Battery Contacts: These are metal prongs that connect to the batteries.
- Motherboard: The main circuit board controlling all functions.
- Buttons: Plastic or rubber parts that press onto the motherboard.
- Infrared (IR) Emitter: Sends signals to your TV or device.
Checking For Damage
Inspect each component carefully for any signs of damage. Here are steps to follow:
- Battery Contacts: Ensure they are not corroded or broken.
- Motherboard: Look for burnt spots or loose connections.
- Buttons: Check if they are intact and responsive.
- IR Emitter: Ensure it is not cracked or dislodged.
If you find any damaged parts, consider replacing them. A well-maintained remote ensures better performance.
Reassembling The Remote
After opening your Samsung remote and fixing the issues, it’s time to put it back together. This section will guide you through reassembling your remote with ease.
Aligning The Halves
First, take both halves of the remote. Ensure all internal components are in place. Look for any loose parts and secure them. Align the two halves carefully. Make sure the buttons fit into their slots.
Double-check the alignment. The edges should match perfectly. If not, adjust them gently. Be patient and precise.
Securing The Screws
Once the halves are aligned, find the screws you removed earlier. Place them in their respective holes. Use a small screwdriver to tighten them. Start with one corner and work your way around. Ensure each screw is snug, but not too tight.
Check all screws once more. This ensures the remote stays together. Your Samsung remote is now reassembled and ready to use.
Testing The Remote
Testing your Samsung remote ensures it works perfectly. Follow these steps to check its functionality.
Inserting Batteries
- Open the battery compartment on the back of the remote.
- Insert two fresh AA batteries.
- Ensure the batteries are placed correctly.
- Close the battery compartment securely.
Verifying Functionality
After inserting the batteries, test your remote:
- Press the power button.
- Point the remote at your Samsung device.
- Check if the device responds.
If your device responds, the remote works. If not, try these steps:
- Ensure the batteries are fresh.
- Check the battery placement.
- Make sure there are no obstructions.
- Try using the remote closer to the device.
If the remote still doesn’t work, there might be a hardware issue.
Frequently Asked Questions
How Do You Open A Samsung Tv Remote?
To open a Samsung TV remote, slide the back cover downwards. Remove the batteries if needed. Use a small screwdriver to open any screws.
How To Remove Back Cover Of Samsung Remote?
Slide the back cover downwards while pressing the small latch. Lift the cover to remove it completely.
How To Change Battery On Samsung Remote?
Slide the back cover off the remote. Remove old batteries. Insert new batteries, ensuring correct polarity. Replace the cover.
How Do You Pop Open A Remote?
To open a remote, locate the seam along the edges. Use a thin tool to gently pry it apart. Be cautious to avoid damaging the plastic.
Conclusion
Opening a Samsung remote is simple with the right steps. Follow our guide to avoid damage and frustration. Ensure you have the necessary tools and handle components carefully. Now you can easily access and fix any issues with your remote.
Enjoy seamless control of your Samsung devices!