The Nest Thermostat might not charge due to a faulty USB cable or adapter. Inspect the charging port and cable for damage and try a different power source.
Navigating technical challenges with smart home devices can be daunting, particularly when the Nest Thermostat fails to charge, potentially disrupting your home’s comfort and energy efficiency. Homeowners and tech enthusiasts alike seek quick, reliable solutions to ensure their devices perform optimally.
A malfunctioning Nest Thermostat can result from various issues, from simple power interruptions to more complex hardware malfunctions. It’s crucial to identify common culprits, such as power outages, tripped circuit breakers, or inadequate power supply from the HVAC system, which might prevent the device from charging. Addressing these challenges promptly can restore functionality, maintain a regulated home environment, and avoid the inconvenience of manual adjustments or professional interventions for what could be straightforward fixes.
Credit: smarthomescoop.com
Troubleshooting The Charge Issue
When your Nest Thermostat faces charging issues, it can disrupt the comfort of your home. An uncharged thermostat can lead to heating or cooling systems not functioning properly. This guide offers simple steps to pinpoint and solve the problem, restoring your thermostat and peace of mind.
Identifying The Problem
Look for these signs:
- No power: The screen is off.
- Low battery message: A notification on the display.
- Unexpected behavior: Thermostat restarting often.
If you notice any of these, your thermostat might have charging issues.
Safety Precautions Before Attempting A Fix
Ensure safety with these steps:
- Turn off power: Cut the power to your HVAC system.
- Check equipment: Use tools that are in good condition.
- Protect yourself: Wear gloves if needed.
After taking these precautions, proceed with troubleshooting the charge issue.
Confirming Power To The Thermostat
Is your Nest thermostat not charging? Start by confirming power to the device. This step is crucial. A simple power issue might be why your Nest won’t charge. Let’s explore solutions.
Checking The Circuit Breaker
Identify your thermostat’s circuit. It’s in your home’s electrical panel. Look for a switch labeled “HVAC” or “Thermostat.”
- Find the correct circuit breaker.
- Check if it’s in the “Off” position.
- If it’s off, flip it to “On.”
- If it’s tripped, reset it.
Wait a few minutes. Power might take a moment to reach your Nest.
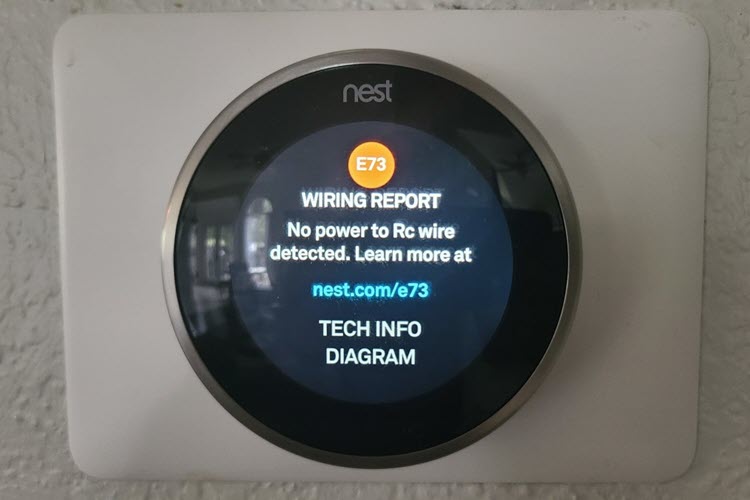
Verifying Thermostat Wiring
Next, confirm the wiring. Thermostat wires must connect properly.
- Switch off power to your HVAC system.
- Remove the Nest thermostat from its base.
- Inspect wires for loose connections or corrosion.
Proper connections ensure your thermostat receives power. If wires are loose, gently press them into place. Corrosion calls for professional help.
Remember to restore power to your HVAC system after checking.
Battery Inspection And Reset Procedures
Smart homes rely on smart devices like the Nest Thermostat. Still, a Nest Thermostat won’t charge can cause a real headache. Before calling for help, let’s look at the battery and try a reset. It might just do the trick!
Assessing The Battery Condition
Checking the Nest’s battery status is straightforward. Start by removing the device from its base. Your Nest might just need a simple recharge. Look at the battery level in the settings. If it’s low, charging is next. Sometimes, the battery needs a bit more help. Maybe it’s time for a reset or even a replacement
- Remove the thermostat from its base.
- Check the battery status in the settings menu.
- Charge if the battery level is low.
- Consider a replacement if problems persist.
Step-by-step Resetting Process
To reset your Nest, you’ll need a simple sequence. This can fix charging issues and get your Nest back to work.
- Press your Nest’s display and open the menu.
- Select ‘Settings’ by turning the ring.
- Find ‘Reset’ and press to choose.
- Pick ‘Restart’ or ‘Factory reset’.
- Follow the on-screen instructions.
Tip: Choose ‘Restart’ to reboot without losing data. ‘Factory reset’ will wipe data, so use it as a last resort.
| Action | Result |
|---|---|
| Restart | Reboots device, keeps data |
| Factory Reset | Wipes all data, last resort |

Credit: www.amazon.com
Common Quick Fixes
Is your Nest thermostat refusing to charge? Don’t fret! Before calling for professional help, you can try a few quick fixes. Often, these methods bring your Nest back to life. They are easy to perform and might save you both time and money.
Recharging Via Usb
Use a USB cable to charge your Nest thermostat. Here’s what to do:
- Find the USB port on the back of your device.
- Plug in a micro-USB cable connected to a power source.
- Wait for the device to charge, which may take up to 2 hours.
Check the battery level in the settings after charging.
Jumpstarting The Battery
If recharging doesn’t work, try a jumpstart.
- Remove the thermostat from its base.
- Use a micro-USB cable to give it a direct charge.
- Reattach it to the base after an hour.
This action can kickstart the battery into charging mode.
Software Updates And Reboots
Software glitches can prevent charging. To fix this:
- Ensure your thermostat is connected to Wi-Fi.
- Go to settings for a software update.
- If updated, perform a reboot by selecting ‘Restart’.
This can resolve underlying software issues affecting the battery.
Preventative Measures For Future Issues
Smart homes rely on devices like the Nest Thermostat for comfort and efficiency. But what if your device won’t charge? Let’s prevent future headaches with proactive steps today.
Routine Maintenance Tips
Keep your Nest Thermostat running smoothly with these simple yet effective tips:
- Check the battery level regularly to ensure it stays charged.
- Clean the thermostat’s display and connectors gently with a soft cloth.
- Perform periodic software updates to improve functionality and security.
- Reset your thermostat seasonally to adapt to temperature changes.
- Ensure your Wi-Fi connection is stable as it’s vital for updates and remote control.
External Factor Considerations
Your Nest Thermostat’s performance may be affected by external factors. Keep these in mind:
| Factor | Action to Take |
|---|---|
| Power Surges | Use a surge protector to safeguard your Nest and other electronics. |
| Wall Location | Install the Nest away from direct sunlight and drafty areas for accurate readings. |
| Home Renovations | Keep the thermostat free from dust and debris during construction activities. |
| Device Compatibility | Ensure your HVAC system is Nest-compatible to avoid charging issues. |
Mindful placement and connectivity can lead to a longer-lasting, reliable Nest Thermostat.
When To Seek Professional Help
Encountering issues with your Nest Thermostat not charging can be frustrating. Simple DIY fixes work for many, yet at times, these problems persist. When basic troubleshooting doesn’t solve the issue, it’s important to acknowledge that professional assistance may be necessary. Let’s explore the signs that indicate it’s time to call in the experts.
Identifying Persistent Complications
Some common signs that your Nest Thermostat complications are beyond a simple fix include:
- Continuous low battery messages even after charging
- Frequent disconnections from your Wi-Fi network
- Unresponsive behavior or failure to power up after resetting
- Error codes that persist despite following troubleshooting steps
When these issues remain unresolved, despite numerous attempts to fix them, seeking professional help is your best bet.
Contacting Certified Technicians
Once you’ve identified persistent issues with your thermostat, contacting a certified technician is your next step:
- Look for a licensed professional who specializes in Nest products.
- Check reviews and ratings to ensure quality service.
- Prepare the model and serial number of your device for a quick consultation.
| Service Type | Benefits |
|---|---|
| Authorized Service | Specialists trained by Nest |
| Warranty Support | Check if your device is still under warranty |
| Expert Guidance | Tailored advice for your specific model |
Remember, tackling the issue with an expert can save you time and protect your investment in the long run. An authorized technician ensures your Nest Thermostat receives the best care with the most effective solutions.
Credit: rgesmartsolutions.com
Frequently Asked Questions Of Fix For Nest Thermostat Wont Charge
Why Is My Nest Not Charging Anymore?
Your Nest thermostat may not be charging due to a power issue, faulty wiring, or a drained battery. Check the power source, wires, and consider a manual charge if necessary.
Why Is My Nest Thermostat Battery Dead?
Your Nest Thermostat battery may be dead due to an aged battery, a malfunctioning power wire, or inadequate charging from your HVAC system’s wiring. Regular usage can also gradually deplete the battery.
How Do I Know If My Nest Battery Is Bad?
To determine if your Nest battery is bad, check for low battery notifications, reduced performance, or inability to hold a charge. Replace the battery if these symptoms persist.
How Can I Tell If My Nest Is Charging?
To determine if your Nest thermostat is charging, check its display for a battery icon or the settings for a battery level indication.
Conclusion
Wrapping up, resolving a Nest Thermostat charging issue can be straightforward with the right steps. Check your connections, power sources, and battery health to ensure smooth operation. Should complications arise, don’t hesitate to contact a professional or refer to Nest support.
Keeping your thermostat charged maintains a comfortable and energy-efficient home environment.