To enable local users and groups management in Windows 11, access the Control Panel and select “User Accounts.” Then, click “Manage user accounts” and choose “Local users and groups.”
Windows 11 offers a simple and efficient way to manage local users and groups. By enabling this feature, users gain greater control over the management of accounts and privileges on their devices. In this guide, we will walk you through the process of enabling local users and groups management in Windows 11, providing you with the tools to customize user access and permissions.
Whether you are a system administrator or a regular user looking to streamline account management, this feature empowers you to take charge of user accounts on your Windows 11 device. Let’s delve into the steps to enable local users and groups management and harness the full potential of Windows 11.
Credit: www.digitalcitizen.life
Local Users Management
Welcome to our guide on enabling local users and groups management in Windows 11. In this section, we will focus on local users management, including creating and deleting local user accounts, modifying local user account settings, and setting user account restrictions.
Creating And Deleting Local User Accounts
To create or delete local user accounts in Windows 11, follow these steps:
- Open the Control Panel.
- Click on “User Accounts” and then “Manage Another Account.”
- Select “Add a new user in PC settings” to create a new account or “Change the account settings” to delete an existing account.
- Follow the prompts to complete the process.
Modifying Local User Account Settings
To modify local user account settings, use the following steps:
- Open the Control Panel and select “User Accounts.”
- Choose “User Accounts” and click on “Change your account type.”
- Select the user account you wish to modify and make the necessary changes.
Setting User Account Restrictions
To set user account restrictions on Windows 11, follow these steps:
- Open the Control Panel and click on “User Accounts.”
- Select “User Accounts” and then “Manage Accounts.”
- Choose the account for which you want to set restrictions, and then click on “Change the account type.”
- Follow the prompts to set the desired restrictions and save the changes.
Local Groups Management
Local Groups Management in Windows 11 gives you the ability to create and manage groups of local users efficiently. This feature allows you to organize users and assign permissions collectively, simplifying the management of access rights and privileges.
Creating And Deleting Local Groups
To create a local group in Windows 11, follow these simple steps:
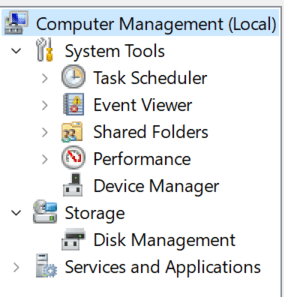
- Open the Computer Management console by right-clicking on the Start button and selecting “Computer Management.”
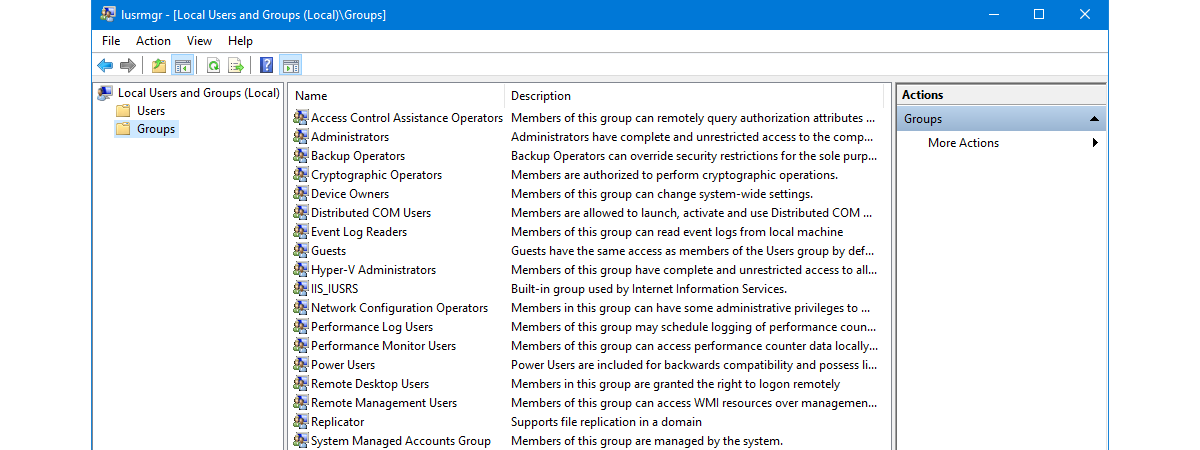
- In the console tree, navigate to “Local Users and Groups” > “Groups.”
- Right-click on “Groups” and choose “New Group.”
- Enter the group name and click “Create.”
Similarly, to delete a local group, right-click on the group in the Computer Management console and select “Delete.”
Managing Group Memberships
Adding users to a local group or removing them from it is a fundamental aspect of managing group memberships. Here’s how to do it:
- Open the group’s properties in the Computer Management console.
- Under the “Members” tab, add or remove the desired users from the group.
Assigning Permissions To Groups
After creating local groups and managing their memberships, the next step is to assign permissions to groups. This involves:
- Identifying the resource or object for which you want to set permissions.
- Opening its properties and accessing the security tab.
- Adding the local group and granting or denying the necessary permissions.
Advanced User And Group Management
Advanced User and Group Management is a crucial aspect of maintaining security and control over user accounts and permissions in Windows 11. With the ability to enable local users and groups management, administrators can efficiently create and manage user accounts, implement policies for centralized control, and ensure secure access to resources across multiple devices. In this article, we will explore some of the advanced techniques for user and group management in Windows 11.
Utilizing User Templates For Efficient Account Creation
One of the time-saving techniques in user and group management is utilizing user templates for efficient account creation. User templates allow administrators to predefine a set of user settings, permissions, and group memberships that can be applied when creating new user accounts. This eliminates the need to manually configure each user account, ensuring consistency and saving valuable time.
Implementing Group Policies For Centralized Control
Group policies provide administrators with a powerful tool for implementing centralized control over user accounts and permissions. By creating group policies, administrators can enforce specific settings, restrictions, and security measures across multiple user accounts or devices. This ensures uniformity and compliance with organizational policies, reducing the risk of unauthorized access and potential security breaches.
Managing User And Group Access Across Multiple Devices
In today’s digital landscape, users often require access to resources from multiple devices, including desktops, laptops, and mobile devices. With advanced user and group management in Windows 11, administrators can streamline the process of managing user and group access across these devices. By linking user accounts to Microsoft 365 or Azure Active Directory, administrators can ensure consistent access to resources regardless of the device being used, enhancing productivity and user satisfaction.
Credit: support.microsoft.com
Best Practices For Local Users And Groups Management
When it comes to managing local users and groups in Windows 11, it is crucial to follow the best practices. By implementing these practices, you can enhance the security of your system and ensure that user accounts are managed effectively. In this section, we will explore some essential practices for local users and groups management.
Regularly Auditing User And Group Accounts
The first best practice is to regularly audit user and group accounts. By conducting regular audits, you can identify any potential security issues or unauthorized access. Auditing provides insights into user and group activities, allowing you to track any changes or suspicious behavior. This helps in maintaining a secure environment and quickly addressing any security concerns.
Implementing Strong Password Policies
Implementing strong password policies is another crucial step in managing local users and groups. Enforcing complex and unique passwords ensures that user accounts are protected from unauthorized access. A strong password policy typically involves defining minimum password length, requiring a combination of uppercase and lowercase letters, numbers, and special characters. By setting these policies, you can minimize the risk of password-based attacks and protect sensitive information.
Enabling Multi-factor Authentication
Enabling multi-factor authentication (MFA) adds an extra layer of security to local user accounts. With MFA, users are required to provide multiple forms of identification, such as a password and a unique verification code sent to their mobile device. This helps in preventing unauthorized access even if someone manages to obtain a user’s password. By enabling MFA, you can significantly enhance the security of user accounts and protect against potential breaches.
In conclusion, following best practices for local users and groups management in Windows 11 is essential to maintain a secure system. Regularly auditing user and group accounts, implementing strong password policies, and enabling multi-factor authentication are key steps in enhancing security. By adhering to these practices, you can effectively manage user accounts, protect sensitive data, and mitigate risks.+

Credit: study.com
Frequently Asked Questions On Enable Local Users And Groups Management In Windows 11
Can I Manage Local Users And Groups In Windows 11?
Yes, Windows 11 allows you to manage local users and groups. This feature helps you control access to your computer, set permissions, and manage user accounts efficiently.
How Do I Enable Local Users And Groups Management In Windows 11?
To enable local users and groups management in Windows 11, follow these steps:
1. Press the Windows key + X and select “Computer Management” from the menu. 2. In the Computer Management window, expand “System Tools” and click on “Local Users and Groups.” 3. Right-click on “Users” or “Groups” and select “New User” or “New Group” to create a new account or group. 4. Customize the properties and settings according to your requirements.
What Are The Benefits Of Managing Local Users And Groups In Windows 11?
Managing local users and groups in Windows 11 provides several benefits, including:
1. Improved security by controlling user access and permissions. 2. Simplified user management, allowing you to create, modify, and delete user accounts easily. 3. Enhanced productivity by efficiently managing user groups and their associated permissions. 4. Customized user experience by assigning specific roles and permissions to different users or groups.
How Can I Delete A Local User Account In Windows 11?
To delete a local user account in Windows 11, follow these steps:
1. Press the Windows key + X and select “Computer Management” from the menu. 2. In the Computer Management window, expand “System Tools” and click on “Local Users and Groups.” 3. Double-click on “Users” to view a list of user accounts. 4. Right-click on the account you want to delete and select “Delete.” 5. Confirm the action and the user account will be permanently deleted from your Windows 11 system.
Conclusion
Enabling local users and groups management in Windows 11 has become a seamless process with its updated features. This functionality empowers users to easily create, manage, and control access to local accounts within their devices. By employing this feature, users can efficiently organize and customize permissions for different user groups, enhancing overall security and efficiency.
Windows 11 continues to prioritize user-friendly interfaces, making it easier than ever to manage local users and groups.