To enable Bitlocker in Windows 10 Home, you can use a third-party encryption tool like M3 Bitlocker Loader. It allows you to encrypt drives using Bitlocker on Windows 10 Home.
If you want to protect your data with Bitlocker on Windows 10 Home edition, you can follow these steps to enable it using a third-party tool. Windows 10 Home edition does not include the Bitlocker feature, which allows you to encrypt your drive for added security.
However, you can still enable Bitlocker functionality using a third-party tool such as M3 Bitlocker Loader. By following a few simple steps, you can encrypt your drives and secure your data on Windows 10 Home. We will guide you through the process of enabling Bitlocker on Windows 10 Home using a third-party tool.
Why Enable Bitlocker?
When it comes to protecting your data on Windows 10 Home, enabling Bitlocker is crucial for maintaining the security and confidentiality of your files. By encrypting your drives, Bitlocker provides a layer of protection that safeguards your data from unauthorized access and ensures its confidentiality.
Protect Against Unauthorized Access
Enabling Bitlocker in Windows 10 Home helps protect your data from unauthorized access. Without the correct credentials, such as a PIN or password, the encrypted drive remains inaccessible, thereby preventing potential breaches and unauthorized data leaks.
Ensure Data Confidentiality
Bitlocker encryption ensures that your data remains confidential, even if your device falls into the wrong hands. By encoding the files and folders on your drive, Bitlocker maintains the integrity and confidentiality of your data, mitigating the risk of unauthorized exposure.
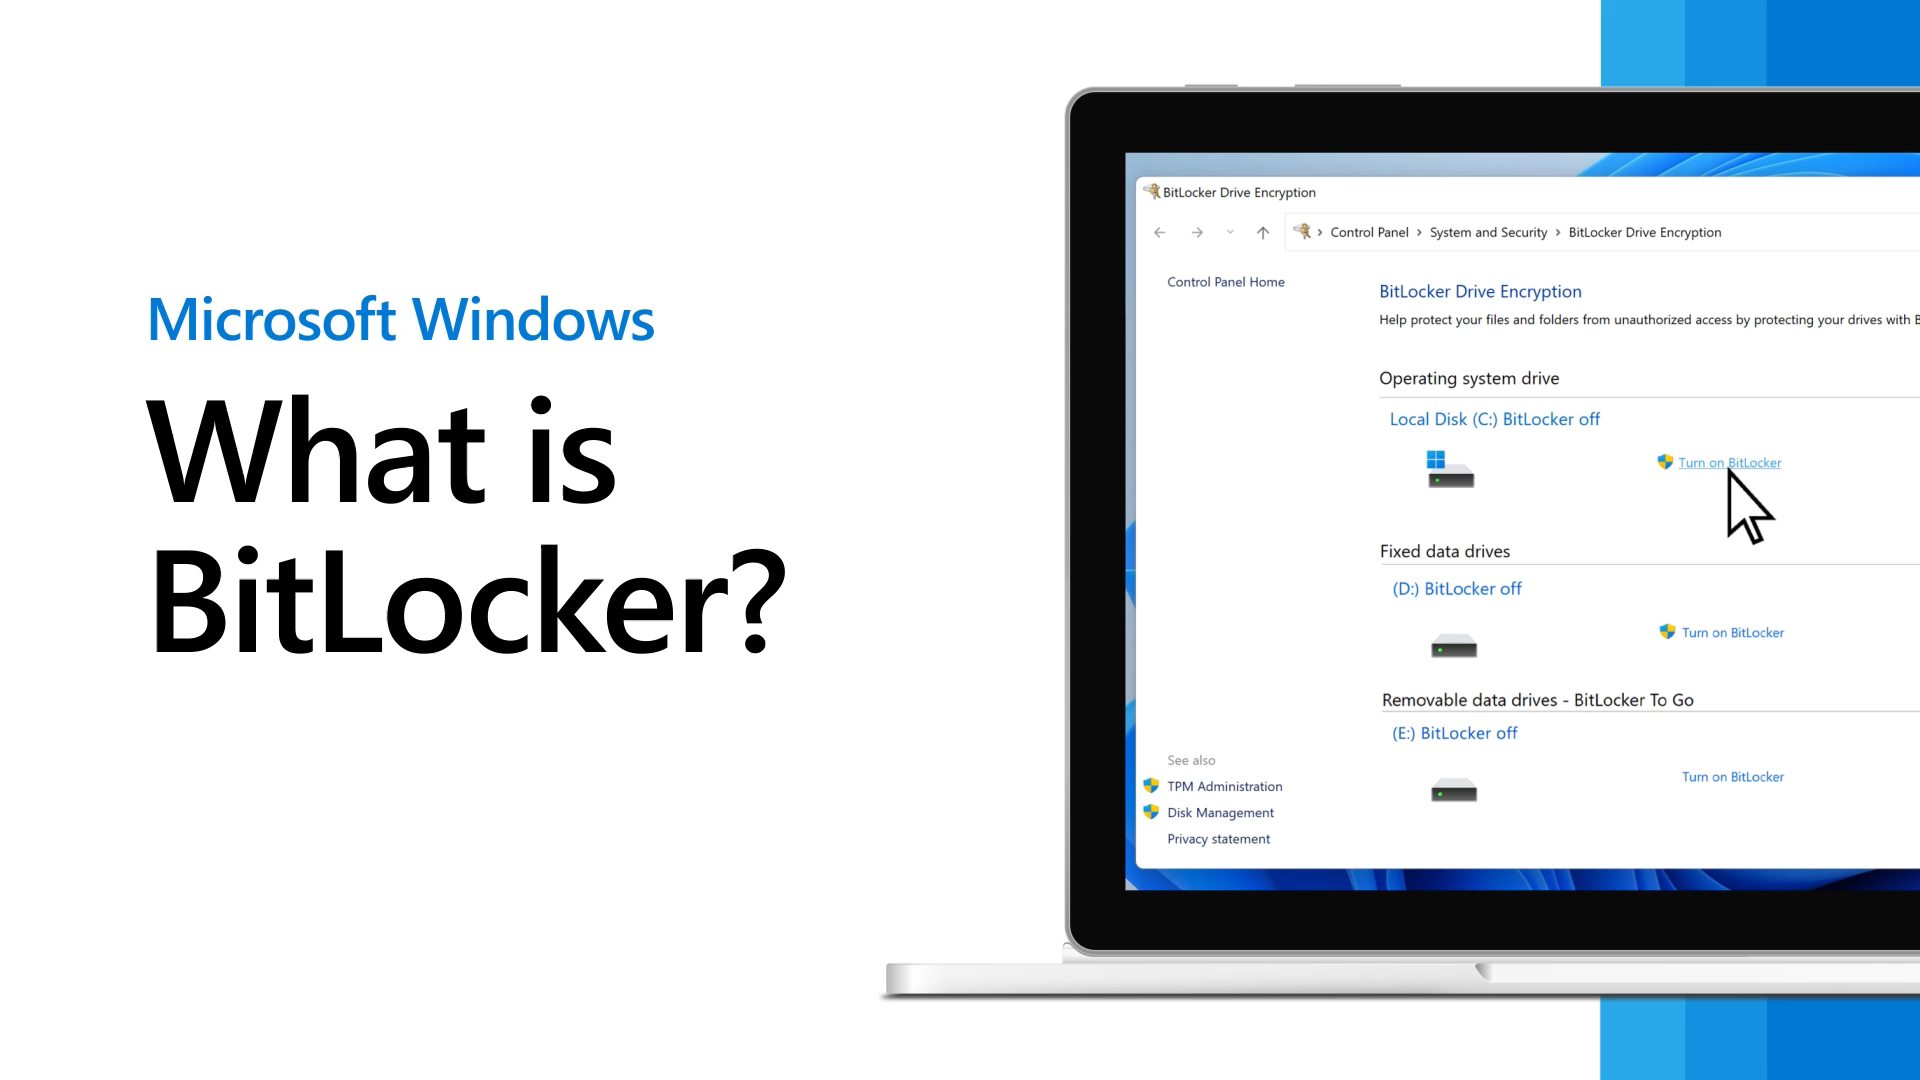
Credit: www.windowscentral.com
Checking System Requirements
To enable BitLocker in Windows 10 Home, it’s crucial to first check the system requirements to ensure a smooth and successful process. This involves verifying the Windows 10 Home edition and conducting a hardware compatibility check.
Verifying Windows 10 Home Edition
Before enabling BitLocker, confirming that the Windows 10 edition is Home is essential. To do this, follow these simple steps:
- Click on the Start button
- Select Settings, then click on System
- Choose About from the options
- Locate the Windows specifications and verify that the edition is listed as “Windows 10 Home”
Hardware Compatibility Check
Ensuring your hardware is compatible is equally vital to enable BitLocker efficiently. Here’s how to conduct a hardware compatibility check:
- Access the Control Panel and navigate to “System and Security”
- Select “BitLocker Drive Encryption”
- Under the “Getting started” section, click on “Is my device ready for BitLocker?”
- Follow the on-screen instructions to complete the hardware compatibility check
Enabling Bitlocker
Bitlocker is a powerful and reliable disk encryption tool that adds an extra layer of security to your Windows 10 Home operating system. Enabling Bitlocker allows you to protect your sensitive data by encrypting your entire drive, ensuring that only authorized users can access it. In this guide, we will walk you through the step-by-step process of enabling Bitlocker on your Windows 10 Home system.
Accessing Bitlocker Settings
Before you can begin the process of enabling Bitlocker, you need to access the Bitlocker settings on your Windows 10 Home system. Here’s how:
- Open the Start menu by clicking on the Windows logo in the bottom left corner of your screen.
- Type “Bitlocker” in the search bar and click on the “Manage Bitlocker” option that appears.
- This will open the Bitlocker settings window, where you can configure and enable Bitlocker on your system.
Choosing Bitlocker Encryption Method
Once you have accessed the Bitlocker settings, the next step is to choose the encryption method that best suits your needs. Bitlocker offers two encryption options: AES 128-bit and AES 256-bit. Here’s how to select the encryption method:
- In the Bitlocker settings window, scroll down to the “Choose an encryption method” section.
- Select either “AES 128-bit” or “AES 256-bit” from the drop-down menu, depending on your preference.
- It’s important to note that AES 256-bit is more secure but may result in slower performance on older systems, while AES 128-bit offers a balance between security and performance.
Setting Up A Bitlocker Password
After choosing the encryption method, the next step is to set up a password that will be used to unlock your encrypted drive. Follow these steps to create a Bitlocker password:
- In the Bitlocker settings window, scroll down to the “Choose how to unlock your drive at startup” section.
- Select the “Password” option and click on the “Add” button.
- Enter a strong password that meets the complexity requirements provided.
- Confirm your password by reentering it in the “Confirm new password” field.
- Click on the “Next” button to proceed.
Congratulations! You have successfully enabled Bitlocker on your Windows 10 Home system. Your drive is now encrypted and protected from unauthorized access. Remember to keep your Bitlocker password safe and secure, as losing it may result in permanent data loss.
That’s it! You can now enjoy the peace of mind that comes with knowing your data is secure with Bitlocker.

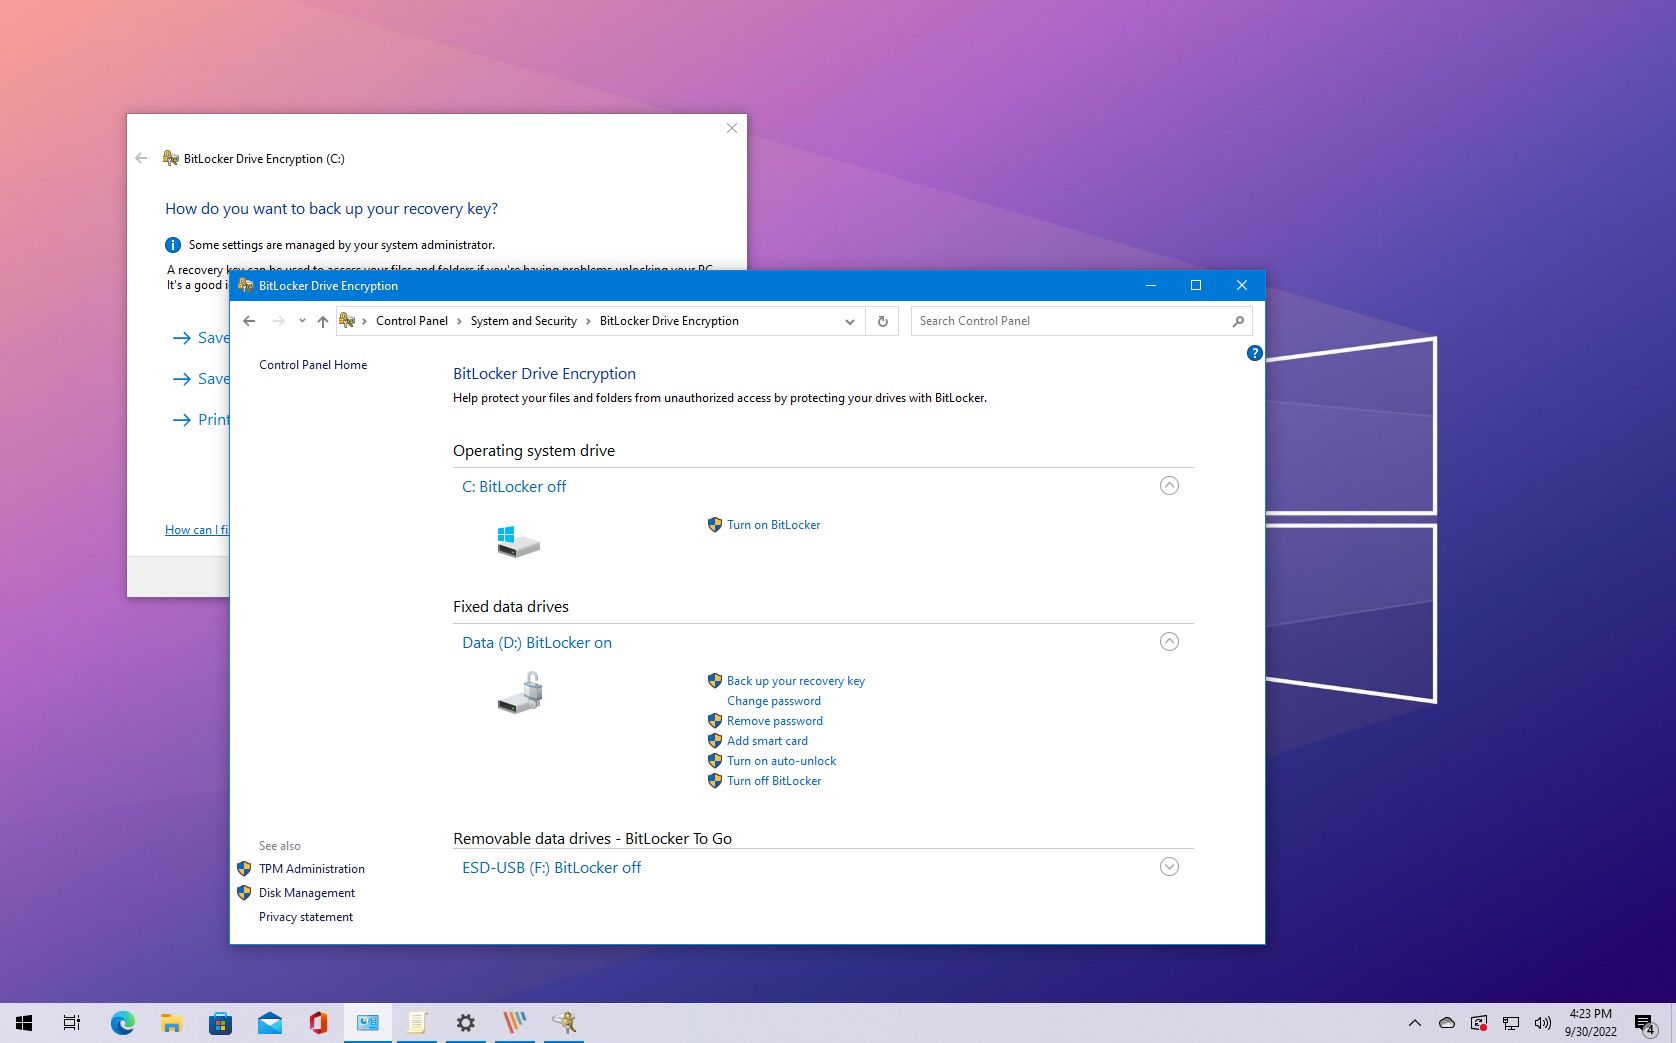
Credit: support.microsoft.com
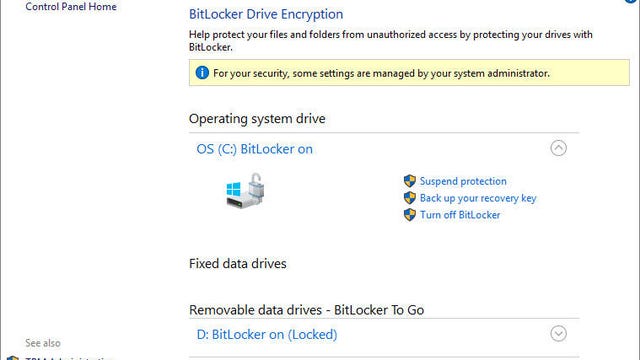
Managing Bitlocker
Bitlocker is a powerful encryption tool that comes built-in with Windows 10 Home. It provides an added layer of security by encrypting your computer’s drives and protecting them from unauthorized access. However, managing Bitlocker settings, recovering the Bitlocker key, and disabling Bitlocker when necessary are crucial tasks that users should be familiar with. In this article, we will explore how to perform these operations effectively.
Changing Bitlocker Settings
If you want to modify the way Bitlocker behaves on your Windows 10 Home system, changing Bitlocker settings is the way to go. Here’s how you can do it:
- Open the Start menu and click on the gear icon to access the Settings menu.
- In the Settings menu, select “Update & Security”.
- Click on “Device encryption” in the left sidebar.
- Under the “Device encryption” section, click on the “Change” button.
- You may be prompted to enter your administrator password or provide confirmation.
- Once authenticated, you can now adjust Bitlocker settings according to your preferences.
Recovering Bitlocker Key
In the event that you forget your Bitlocker encryption key or lose access to it, don’t panic! Windows 10 Home provides a way for you to recover the Bitlocker key. Here’s what you need to do:
- Open the “Bitlocker Drive Encryption” window by searching for “Bitlocker” in the Start menu.
- Click on the drive for which you need to recover the Bitlocker key.
- Select the option “More options” in the “Enter your recovery key” prompt.
- Choose “Enter recovery key” and follow the on-screen instructions to recover your key.
Disabling Bitlocker
There may be situations where you need to temporarily or permanently disable Bitlocker on your Windows 10 Home system. Here’s how you can do it:
- Open the Start menu and click on the gear icon to access the Settings menu.
- In the Settings menu, select “Update & Security”.
- Click on “Device encryption” in the left sidebar.
- Under the “Device encryption” section, click on the “Turn off” button.
- Follow the on-screen instructions to complete the process.
Managing Bitlocker settings, recovering the Bitlocker key, and disabling Bitlocker are essential tasks for Windows 10 Home users. By following the steps outlined above, you can effectively control Bitlocker and ensure the security of your data.
Best Practices For Bitlocker
Bitlocker is a powerful tool for encrypting your data in Windows 10 Home, providing an added layer of security to protect your files and folders. To ensure the smooth operation of Bitlocker and maximize its benefits, it is important to follow a set of best practices. In this article, we will discuss two crucial practices for using Bitlocker effectively:
Backing Up Bitlocker Recovery Key
One of the first steps for using Bitlocker is to back up the recovery key. The recovery key is a crucial component of Bitlocker, allowing you to access your encrypted data in case of any unforeseen circumstances. Failing to back up this key could result in permanent data loss if you forget the password or encounter hardware issues.
Backing up the Bitlocker recovery key is a simple and essential process. You can save it to a USB drive, print a hard copy, store it in a secure location, or use Microsoft’s Bitlocker Recovery Key feature to back it up to your Microsoft Account or Azure Active Directory. By implementing this best practice, you can ensure the safety of your data in the event of an emergency.
Updating Windows 10 Regularly
Keeping your Windows 10 operating system up to date is not only crucial for security reasons but also important when using Bitlocker. Microsoft regularly releases updates that include bug fixes, enhancements, and security patches. By updating your Windows 10 regularly, you can ensure that Bitlocker operates smoothly and efficiently.
Windows 10 updates often include improvements to Bitlocker, ensuring the highest level of data protection. These updates can address vulnerabilities that may compromise the security of encryption protocols used by Bitlocker. Regular updating also helps to minimize compatibility issues with system hardware and software, allowing Bitlocker to function optimally at all times.
Updating Windows 10 is a straightforward process. Simply go to the Windows Update settings and check for any available updates. If there are any, download and install them to keep your system and Bitlocker secure.
Credit: www.zdnet.com
Frequently Asked Questions For Enable Bitlocker In Windows 10 Home
How Do I Enable Bitlocker In Windows 10 Home?
To enable BitLocker in Windows 10 Home, go to the Control Panel, click on System and Security, then choose BitLocker Drive Encryption. From there, select the drive you want to encrypt, click Turn On BitLocker, and follow the prompts to complete the process.
Can I Use Bitlocker In Windows 10 Home Edition?
Absolutely! BitLocker is available in Windows 10 Home edition. You can use it to encrypt your drives and protect your data from unauthorized access. Just follow the steps mentioned earlier to enable BitLocker on your Windows 10 Home edition.
Is It Necessary To Have A Tpm Chip To Enable Bitlocker In Windows 10 Home?
No, it is not necessary to have a TPM (Trusted Platform Module) chip to enable BitLocker in Windows 10 Home. However, if your device does not have a TPM chip, you will need to use an alternative method like a USB flash drive to store the encryption key.
How Does Bitlocker Encryption Work?
BitLocker encryption works by encrypting the entire drive, which includes the operating system, system files, and user data. It uses strong encryption algorithms to protect the data. When you turn on your computer and enter the correct password or insert the appropriate USB key, the encrypted data is decrypted and made accessible.
Conclusion
Enabling BitLocker in Windows 10 Home allows you to add an extra layer of security to your files and drives. With its easy-to-use interface and seamless integration, protecting your data has never been simpler. By following the steps outlined in this blog post, you can ensure the safety and privacy of your important information.
Take advantage of this powerful encryption tool and enjoy peace of mind knowing that your files are secure.