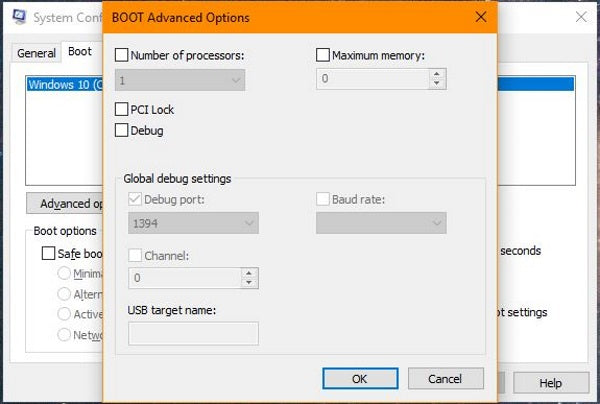
To enable all cores in Windows 10, access the “System Configuration” and navigate to the “Boot” tab. Then select “Advanced options” and check the box for “Number of processors.”
With this setting, all cores will be enabled for optimal performance. Ensuring that all CPU cores are enabled in Windows 10 can significantly enhance your system’s overall performance. By following a few simple steps, you can boost your computer’s processing power and improve its efficiency.
Enabling all cores allows your system to efficiently handle multitasking and demanding applications, resulting in smoother performance and faster response times. This optimization is particularly beneficial for gaming, video editing, and other CPU-intensive tasks. In this guide, we will walk you through the process of enabling all cores in Windows 10, empowering you to unleash the full potential of your computer’s hardware.
Determine Core Usage
Determining the core usage of your Windows 10 system is crucial for optimizing its performance and ensuring that all cores are enabled to carry out tasks efficiently. By understanding how your CPU utilizes its cores, you can identify any potential bottlenecks and maximize the processing power of your system.
Check Current Core Usage
To determine the current core usage of your Windows 10 system, you can utilize the Task Manager. Press Ctrl + Shift + Esc to open Task Manager, then navigate to the “Performance” tab. Here, you can find the “CPU” section, which displays the usage of each core as well as the overall CPU usage. This provides valuable insights into how the cores are being utilized and whether there are any imbalances.
Identifying Cpu Bottlenecks
Identifying CPU bottlenecks is essential for ensuring that all cores are effectively utilized. A bottleneck occurs when certain cores are consistently maxed out while others remain underutilized. This can lead to decreased overall performance and efficiency. By identifying these bottlenecks, you can take steps to optimize core usage and enable all cores on your Windows 10 system.

Credit: keys.direct
Enable All Cores In Windows 10
Are you looking to improve the performance of your Windows 10 system? Enabling all processor cores can enhance your computer’s speed and efficiency. In this blog post, we’ll explore how to enable all cores in Windows 10 using the Task Manager and changing core affinity.
Using The Task Manager
To enable all cores in Windows 10 using the Task Manager, you can follow these steps:
- Right-click on the taskbar and select “Task Manager” from the menu.
- Navigate to the “Details” tab.
- Right-click on the program for which you want to enable all cores.
- Select “Set affinity” from the menu.
- Check the box next to “All Processors.”
Changing Core Affinity
If you prefer to change core affinity using Command Prompt, the following steps can help you achieve that:
- Open Command Prompt as an administrator.
- Enter “wmic” and press Enter.
- Type “cpu get caption” and press Enter to display a list of CPU cores.
- Enter “cpu get DeviceID,NumberOfCores,NumberOfLogicalProcessors” to view detailed information about each core.
- Finally, use the “wmic cpu where DeviceID=0 call SetThreadExecutionState 2” command to enable all CPU cores.
By following these steps, you can enable all cores in Windows 10, optimizing your system’s performance and efficiency.
Considerations And Precautions
When it comes to enabling all cores in Windows 10, there are a few important considerations and precautions to keep in mind. While unlocking the full potential of your processor can lead to improved performance, it’s important to understand the compatibility and performance implications as well as the risks associated with overheating and increased power consumption.
Compatibility
Before enabling all cores in Windows 10, it’s crucial to check the compatibility of your hardware and software. Not all processors and motherboards support this feature, so it’s important to do some research beforehand. Refer to your processor’s specifications to determine if all cores can indeed be enabled. Additionally, ensure that your operating system and applications are optimized to make use of the additional cores.
Performance
Enabling all cores in Windows 10 can provide a significant boost in performance, especially for CPU-intensive tasks such as video editing, gaming, and rendering. By distributing the workload across multiple cores, your system can handle more demands simultaneously, resulting in a smoother and more efficient experience. However, it’s important to note that not all applications are capable of utilizing multiple cores effectively, so the performance gains may vary depending on the task at hand.
Overheating And Power Consumption
Enabling all cores in Windows 10 can increase the heat generated by your CPU. This can lead to higher temperatures, potentially causing overheating if your system’s cooling capabilities are insufficient. It’s essential to ensure that your computer is equipped with adequate cooling solutions, such as a high-quality CPU cooler and sufficient airflow in your case. Additionally, keep an eye on the temperatures using monitoring software, and if necessary, adjust the core voltages and frequencies for optimal performance and temperature balance.
Furthermore, enabling all cores in Windows 10 can also result in increased power consumption. With more cores active, the CPU will draw more power and generate more heat. This can be a concern, especially for laptops and portable devices that depend on battery life. Monitoring your power usage and adjusting your system’s power settings accordingly can help mitigate any potential issues related to excessive power consumption.

Credit: www.youtube.com
Monitoring And Performance Testing
Boost the performance of your Windows 10 by enabling all cores through monitoring and performance testing. Enhance the speed and efficiency of your system for optimal performance.
Monitoring Cpu Usage
One of the crucial aspects when it comes to optimizing your Windows 10 system’s performance is monitoring the CPU usage. By keeping a close eye on the CPU usage, you can efficiently identify any bottlenecks or overloads that might be hindering your system’s overall performance. With the help of various monitoring tools, you can gain valuable insights into how your CPU is functioning and take necessary steps to address any issues.
One of the efficient ways to monitor your CPU usage is by utilizing the built-in Windows Task Manager. This powerful tool provides real-time information about the processes and applications that are utilizing your CPU’s resources. With the detailed graphs and statistics provided by the Task Manager, you can easily identify which applications or processes are putting a strain on your CPU. By detecting any excessive CPU usage, you can take appropriate measures such as closing unnecessary applications or optimizing resource allocation to ensure smooth system performance.
Stress Testing System Stability
Ensuring the stability of your system is essential to maintain optimal performance. Stress testing your system allows you to evaluate its stability under heavy load conditions and identify any potential issues that may arise. By subjecting your system to high levels of stress, you can test its performance and measure its ability to handle resource-intensive tasks.
There are several stress-testing tools available for Windows 10 that can help you assess the stability of your system. These tools simulate heavy workloads by putting your CPU, RAM, and GPU under intense load, enabling you to identify any deficiencies or weaknesses in your system’s components. By stress testing your system, you can ensure its reliability and determine if it can handle demanding tasks such as gaming, video editing, or running complex software without any hiccups.
One such popular stress-testing tool is Prime95. This software application is designed to maximize your CPU’s performance and push it to its limits, allowing you to monitor the system’s stability by checking for errors, overheating, or crashes. Through stress testing, you can evaluate the effectiveness of any changes you make to increase the performance of your system and ensure its smooth operation even under heavy workloads.

Credit: m.youtube.com
Frequently Asked Questions For Enable All Cores In Windows 10
How Do I Enable All Cores In Windows 10?
To enable all cores in Windows 10, go to the Task Manager by right-clicking on the taskbar and selecting “Task Manager. ” Then, click on the “Performance” tab and select “CPU. ” Under the “CPU” tab, check if all cores are enabled.
If not, right-click on the CPU graph and select “Change graph to” and then “Logical processors. ” This will enable all cores in Windows 10.
Why Should I Enable All Cores In Windows 10?
Enabling all cores in Windows 10 allows your computer to perform tasks more efficiently and quickly. It helps in multitasking by distributing the workload across all cores, leading to improved performance and reduced latency. It is especially useful for resource-intensive tasks like gaming, video editing, and running virtual machines.
Will Enabling All Cores In Windows 10 Improve Gaming Performance?
Yes, enabling all cores in Windows 10 can significantly improve gaming performance. Games are becoming more optimized for multi-core processors, and enabling all cores allows the game to utilize the available processing power efficiently. This leads to smoother gameplay, faster load times, and improved overall gaming experience.
Conclusion
In a nutshell, enabling all cores in Windows 10 unleashes the full power of your computer. By optimizing the usage of your CPU cores, you can experience faster and more efficient performance, especially when running demanding tasks or applications. So, don’t let any cores go to waste.
Take advantage of this simple tweak to enhance your overall computing experience. Your computer will thank you!