To create invisible folders in Windows 11, you can use the “attrib” command in the command prompt to hide the folder. This will make the folder invisible and its contents inaccessible to regular users.
In Windows 11, hiding folders can be useful for keeping sensitive or personal files out of sight. By creating invisible folders, you can protect your privacy and maintain a clutter-free desktop or file explorer. This simple trick can be handy for organizing your files discreetly.
We will guide you through the steps to create invisible folders in Windows 11 using the command prompt. Whether you want to hide sensitive documents or simply keep your desktop tidy, learning how to make folders invisible can be a useful skill for Windows 11 users. Let’s dive in and discover how to create invisible folders in Windows 11.

Credit: www.digitaltrends.com
Method 1: Renaming Folders
Step 1: Select The Folder
To create an invisible folder in Windows 11, you need to first select the folder you want to make invisible.
Step 2: Rename The Folder
After selecting the folder, right-click on it and choose Rename from the context menu. Then, erase the existing name and replace it with a single space by pressing the spacebar. Hit Enter to save the changes.
Step 3: Remove The Folder Icon
To hide the folder icon, right-click on the folder and choose Properties from the context menu. In the Customize tab, click on the Change Icon button, then scroll to the left where you will find a blank space, select it, and click OK to save the changes.”
Credit: www.bitdefender.com
Method 2: Using Command Prompt
Step 1: Open Command Prompt
To create invisible folders in Windows 11, one effective method is using the Command Prompt. To begin, open the Command Prompt by typing “cmd” in the Windows search bar and selecting Command Prompt from the search results.
Step 2: Navigate To The Folder Location
Next, navigate to the location where you want to create the invisible folder. You can use the “cd” command followed by the folder path to change the directory in Command Prompt.
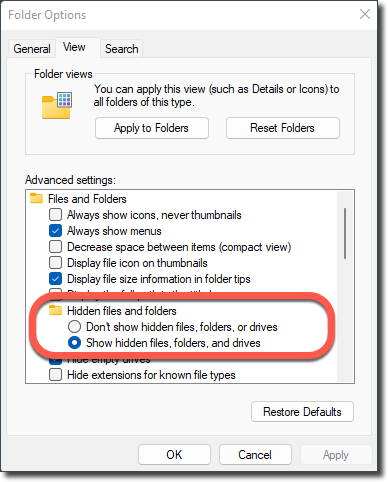
Step 3: Hide The Folder Using Attributes
Once you are in the desired location, enter the command “attrib +h +s +r foldername” to hide the folder. Replace “foldername” with the name of the folder you want to make invisible. The attributes +h, +s, and +r make the folder hidden, system, and read-only, respectively. After executing the command, the specified folder will become invisible and won’t be visible in File Explorer.
Method 3: Using Third-party Software
While Windows 11 does not have a built-in feature to create invisible folders, you can rely on third-party software to achieve this. These software solutions provide an easy and effective way to hide your folders from prying eyes. In this section, we will guide you through the process step by step.
Step 1: Download And Install The Software
The first step is to download and install the third-party software on your Windows 11 computer. There are various options available online, but for the purpose of this tutorial, we will be using the popular software called Folder Guard.
- Start by visiting the official website of Folder Guard (https://www.folderguard.com/) in your web browser.
- Locate the “Downloads” section on the website and click on it.
- Choose the appropriate version of Folder Guard that matches your operating system, and click on the download button.
- Once the download is complete, double-click on the downloaded file to begin the installation process.
- Follow the on-screen instructions to install Folder Guard on your computer.
Step 2: Create An Invisible Folder
After successfully installing Folder Guard, you can now proceed to create an invisible folder:
- Locate the folder where you want to create the invisible folder.
- Right-click on the folder and select the Folder Guard option from the context menu.
- In the Folder Guard window that appears, click on the “Hide” button.
- Confirm your action by clicking on the “Yes” button in the confirmation dialog box.
- The folder will now become invisible, effectively hiding its contents from view.
Step 3: Customize Folder Properties
In order to ensure the invisibility of the folder, you can customize its properties:
- Right-click on the folder that you made invisible using Folder Guard.
- Select the Folder Guard option from the context menu.
- In the Folder Guard window, click on the “Properties” button.
- Here, you can further customize the folder’s properties, such as setting a password or specifying access restrictions.
- Make the necessary changes and click on the “OK” button to save the modifications.
By following these steps, you can easily create invisible folders on your Windows 11 computer using third-party software like Folder Guard. This method provides an effective way to protect your sensitive files and keep them hidden from unauthorized access.

Credit: mobiletrans.wondershare.com
Tips And Precautions
When it comes to creating invisible folders in Windows 11, it’s important to follow some tips and take necessary precautions to ensure a smooth and hassle-free experience. In this section, we will discuss two helpful tips and one crucial precaution that you should keep in mind while creating invisible folders.
Tip 1: Backup Important Files
Before you start creating invisible folders, it’s always a good practice to ensure you have a backup of your important files. Modifying system settings can sometimes lead to unexpected outcomes, and having a backup will provide you with peace of mind. Consider creating a separate backup folder and regularly backing up your files to avoid any potential loss. By following this tip, you can avoid the risk of losing your important data while experimenting with invisible folders.
Tip 2: Use Unique Folder Names
When creating invisible folders, it’s essential to use unique and distinct folder names. This will help you easily locate and manage your hidden folders in the future. Avoid using generic names like “Hidden” or “Invisible” as they can easily be detected by others. Instead, come up with unique but inconspicuous names for your invisible folders. This way, you can maintain privacy while organizing your files in a discreet manner.
Precaution: Be Cautious While Modifying System Folders
While the idea of creating invisible folders may seem exciting, it’s important to exercise caution when modifying system folders. System folders contain crucial files and altering them without proper knowledge can lead to system instability or even loss of data. Always double-check the folders you are working with and ensure they are not critical system directories. Making unintended changes to these folders can affect the overall performance of your Windows 11 operating system. It’s best to research and understand the folder structure of your system before making any modifications to avoid any adverse effects.
Frequently Asked Questions For Create Invisible Folders In Windows 11
How Do I Create An Invisible Folder In Windows 11?
To create an invisible folder in Windows 11, right-click on your desktop, select “New Folder,” and then rename the folder with a blank space by holding the Alt key (Alt+0160). This will create a folder without any visible name or icon.
Can I Make An Invisible Folder Visible Again In Windows 11?
Yes, you can make an invisible folder visible again in Windows 11. Right-click on the desktop, select “View,” and then click on “Show desktop icons” to show all hidden folders and files, including the invisible folder you created.
How Can I Access Files In An Invisible Folder In Windows 11?
To access files in an invisible folder in Windows 11, you can use the folder’s location path or search for the file name in File Explorer. Alternatively, you can make the folder temporarily visible by following the steps mentioned above, access the files, and then hide the folder again.
Conclusion
Creating invisible folders in Windows 11 is a powerful way to organize and protect your sensitive files. By following the simple steps outlined in this blog post, you can easily hide folders from prying eyes while still having convenient access to them.
With this trick, you can keep your data secure and maintain a clutter-free desktop. So why wait? Start implementing this technique today and take control of your digital files.