To clear quick access history in Windows 11, click the three-dot menu and select “Clear quick access” – it’s that simple. Clearing your quick access history in Windows 11 can help maintain your privacy and keep your file history organized.
By following a few simple steps, you can ensure that your quick access history remains clean and uncluttered. Whether you’re looking to remove specific files or reset your entire file history, Windows 11 provides easy options for managing your quick access history.
In this guide, we’ll show you how to clear quick access history in Windows 11, allowing you to maintain a tidy and efficient file management system.
How To Clear Quick Access History
When it comes to keeping your Windows 11 Quick Access history clean and organized, you might want to periodically clear out recent activities. This can help maintain privacy and streamline your file management experience. In this guide, we’ll walk you through the steps to clear your Quick Access history in Windows 11, ensuring that you can enjoy a decluttered and more efficient workspace.
Accessing Quick Access Settings
To begin clearing your Quick Access history, you’ll first need to access the Quick Access settings. Follow the steps below:
- Open the File Explorer by clicking on the folder icon in the taskbar or pressing Windows key + E.
- In the File Explorer window, locate and click on the “Quick Access” option in the left-hand navigation pane.
- Next, click on the “View” tab in the top menu, and then select “Options” from the ribbon.
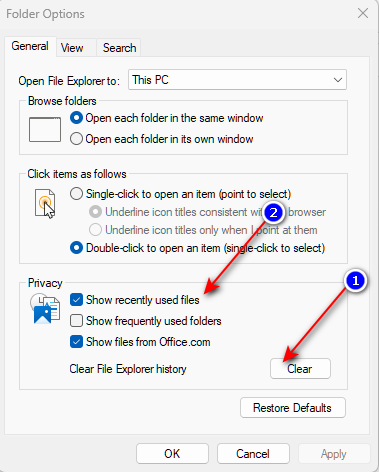
- Clicking “Options” will open the Folder Options window. Here, navigate to the “Privacy” section.
Clearing Recent Activities
Now that you’ve accessed the Quick Access settings, it’s time to clear out your recent activities. Follow these straightforward steps:
- Tick the checkbox next to “Clear File Explorer history” to remove the recent files and frequently used folders from Quick Access.
- After selecting the checkbox, click on the “Clear” button to erase the history.
- Once you’ve cleared the history, click “Apply” and then “OK” to save the changes and exit the Folder Options window.
Congratulations! You’ve successfully cleared your Quick Access history in Windows 11, ensuring that your file management remains streamlined and your privacy is maintained.

Credit: www.samsung.com
Benefits Of Removing Recent Activities
The benefits of removing recent activities in Windows 11 include improved privacy, faster access to desired files, and a clutter-free Quick Access history. Clearing this history helps maintain security and enhances productivity for users.
Enhanced Privacy
Clearing your quick access history in Windows 11 offers several significant benefits, starting with enhanced privacy. When you remove your recent activities, you take control of your personal information and safeguard it from unauthorized access. This simple action ensures that sensitive files, documents, or websites you have accessed are not readily visible to others who may use your device or have access to it.
Improved System Performance
Deleting your recent activities not only enhances your privacy but also improves the overall performance of your Windows 11 system. When your quick access history grows over time, it can slow down the responsiveness of your device. By regularly clearing this history, you can enjoy a faster and more efficient computing experience.
Removing the clutter of past activities helps streamline the search processes and reduces the time it takes for your system to retrieve information. It eliminates unnecessary data that can accumulate and impact system resources, allowing your computer to function optimally.
How To Clear Quick Access History In Windows 11
Now that you understand the benefits of removing recent activities, let’s dive into the steps to clear your quick access history in Windows 11:
- Click on the Start button in the taskbar to open the Start menu.
- Within the Start menu, locate and click on the Settings icon, which resembles a gear.
- In the Settings window, select the Privacy & Security section.

- Within Privacy & Security, click on the Clear History option.
- A pop-up window will appear, offering you the choice to clear your activity history for different time intervals. Select the desired timeframe or choose “All time” for a complete wipe of your quick access history.
- Click on the Clear button to remove your recent activities.
Automating Quick Access History Clearing
Clearing your Quick Access history in Windows 11 can be a tedious task, especially if you frequently use this feature. However, you can simplify this process by automating the clearing of your Quick Access history. By setting up a few simple steps, you can ensure that your Quick Access history is regularly cleared without any manual intervention. In this post, we will explore two methods to automate Quick Access history clearing: using Task Scheduler and creating a batch file.
Using Task Scheduler
If you are familiar with Windows 11, you might already know about the powerful tool called Task Scheduler. Task Scheduler allows you to schedule various tasks on your computer, ensuring that they are executed automatically at a specified time or event. In this case, we can use Task Scheduler to automatically clear our Quick Access history.
Here are the steps to set up Task Scheduler:
- Open Task Scheduler by searching for it in the Start menu.
- Click on “Create Basic Task” on the right sidebar.
- Give your task a name and a description. For example, you can name it “Automated Quick Access History Clearing”.
- Select the frequency at which you want the task to run. You can choose daily, weekly, or even monthly depending on your preference.
- Next, select the action to perform. In this case, we want to clear the Quick Access history, so choose “Start a program”.
- Enter the following command in the Program/script field:
cmd.exe - For the arguments field, enter the following command:
/c del /f /q %APPDATA%\Microsoft\Windows\Recent\AutomaticDestinations\ - Click on “Finish” to complete the setup.
Now, your task is scheduled to run at the specified frequency, automatically clearing your Quick Access history. You can modify or delete this task at any time through Task Scheduler.
Creating A Batch File
If you prefer a more customized approach, you can create a batch file to clear your Quick Access history. A batch file is a script that contains a series of commands to be executed in sequence.
Here’s how you can create a batch file to automate Quick Access history clearing:
- Open Notepad or any text editor on your computer.
- Type the following command into the text editor:
@echo off & del /f /q %APPDATA%\Microsoft\Windows\Recent\AutomaticDestinations\ - Save the file with a
.batextension. For example, you can name itClearQuickAccess.bat. - Double-click on the batch file to execute it and clear your Quick Access history instantly.
By using this batch file, you have full control over when and how often you want to clear your Quick Access history. You can even schedule it to run at specific times using Task Scheduler if you wish.

Credit: techcommunity.microsoft.com
Credit: www.samsung.com
Frequently Asked Questions Of Clear Quick Access History In Windows 11
How Do I Clear Quick Access History In Windows 11?
To clear the Quick Access history in Windows 11, right-click on the Quick Access icon, select “Options,” click “Clear” under the “Privacy” section, and then click “OK. ” This will remove all the recently accessed files and folders from the Quick Access history, ensuring your privacy and decluttering the list.
Can I Customize The Quick Access List In Windows 11?
Yes, you can customize the Quick Access list in Windows 11. Simply right-click on any file or folder and select “Pin to Quick Access” to add it to the list. Similarly, right-click on an item in the Quick Access list and choose “Unpin from Quick Access” to remove it.
This allows you to personalize the list according to your frequently used files and folders.
How Many Items Are Displayed In Quick Access In Windows 11?
By default, Windows 11 displays up to 20 items in the Quick Access list. However, you can change the number of items displayed by going to the “Options” in the Quick Access menu and adjusting the “Show recent files” slider.
This allows you to view a greater or lesser number of recently accessed items in the Quick Access list.
What Is The Purpose Of Quick Access In Windows 11?
The purpose of Quick Access in Windows 11 is to provide a convenient way to access your most frequently used files and folders. It allows you to quickly navigate to recently opened files or folders without having to go through multiple directories.
The Quick Access list is dynamic and automatically updates based on your usage patterns.
Conclusion
Clearing the quick access history in Windows 11 is a simple yet effective way to maintain privacy and declutter your computer. By following the steps outlined in this blog post, you can easily remove any sensitive or unwanted files from your quick access history.
Whether you’re concerned about privacy or simply want a cleaner user experience, clearing your quick access history is a valuable practice. Take control of your Windows 11 experience today and enjoy a more personalized and efficient computing environment.