Toilet troubleshooting for a fill valve involves checking for leaks, improper water levels, and ensuring the valve is not clogged. Adjust or replace the valve if issues persist.
A malfunctioning toilet fill valve can cause various issues, from constant running water to improper bowl refilling. These problems not only waste water but can also lead to higher utility bills and potential damage to your toilet. Understanding how to troubleshoot and fix a fill valve can save time and money.
Common causes of fill valve issues include debris buildup, wear and tear, or incorrect installation. By diagnosing the problem early, you can maintain your toilet’s efficiency and avoid costly repairs. This guide will help you identify and address fill valve problems effectively.
Identifying Fill Valve Issues
Fill valve problems can cause a toilet to malfunction. Identifying fill valve issues early can save water and prevent damage. Understanding the symptoms and causes helps in quick troubleshooting.
Symptoms To Watch For
Several symptoms may indicate a fill valve problem:
- Constant Running Water: The toilet keeps running after flushing.
- Weak Flush: The toilet does not flush completely.
- Hissing Sound: A continuous hissing sound from the toilet tank.
- Slow Refill: The tank takes too long to refill.
Common Causes
Common causes of fill valve issues include:
| Cause | Description |
|---|---|
| Debris | Debris can clog the fill valve, disrupting water flow. |
| Wear and Tear | Fill valves may wear out over time, causing malfunctions. |
| Improper Installation | A fill valve not installed correctly can fail to function. |
Regular inspection and maintenance can prevent fill valve issues. Replace or clean faulty parts to ensure a smooth operation.
Tools And Materials Needed
Fixing a toilet fill valve can seem tricky. But with the right tools and materials, the task becomes manageable. Here’s a guide on what you’ll need.
Essential Tools
- Adjustable Wrench: Adjusts to different sizes of nuts and bolts.
- Flathead Screwdriver: Useful for prying and unscrewing flathead screws.
- Bucket: Catches water to prevent spills.
- Old Towels: Absorbs any extra water that spills.
Recommended Materials
- Replacement Fill Valve: Ensures proper water flow into the tank.
- Rubber Washers: Creates a watertight seal.
- PTFE Tape: Seals threaded pipe connections to prevent leaks.
- Cleaning Cloth: Wipes down any dirt or grime.
Shutting Off Water Supply
Toilet fill valves can malfunction, causing water issues. Before fixing, you must shut off the water supply. This prevents further leaks and damage. Follow these steps to ensure safety and efficiency.
Locating The Shutoff Valve
The shutoff valve is usually behind the toilet. It’s close to the wall and connected to the water supply line. Look for a small, round handle or lever.
In some homes, the shutoff valve might be under the sink or in the basement. Check these areas if you can’t find it behind the toilet.
Steps To Turn Off Water
Once you locate the shutoff valve, follow these steps:
- Turn the valve handle clockwise to close it.
- Check if the water stops flowing by flushing the toilet.
- If water still flows, tighten the valve more.
- Ensure the valve is fully closed before starting repairs.
Always make sure the water supply is off to avoid spills.
Inspecting The Fill Valve
Inspecting the fill valve is crucial in toilet troubleshooting. A faulty fill valve can cause many problems. This guide will help you inspect the fill valve efficiently.
Visual Inspection Tips
Start by turning off the water supply. Remove the toilet tank lid carefully. Look inside the tank for the fill valve. The fill valve is usually on the left side.
- Check for any obvious damage.
- Ensure the valve is securely attached.
- Look for dirt or debris around the valve.
Use a flashlight for a better view. Ensure all parts are intact. A broken part can cause leaks or fill issues.
Signs Of Wear And Tear
Signs of wear and tear indicate the need for a replacement. Look for cracks on the valve body. Cracks can cause water leaks.
Check the fill valve’s float. Ensure the float moves freely. A stuck float can prevent proper filling.
Look for corrosion around the valve. Corrosion can weaken the valve over time. If you see rust, it’s time to replace the valve.
Listen for unusual noises. A hissing sound can indicate a problem. It might mean the valve is not sealing properly.
Inspect the fill tube attached to the valve. Ensure it is not kinked or blocked. A blocked fill tube can cause slow filling.
| Inspection Point | Possible Issue |
|---|---|
| Cracks on Valve | Water Leaks |
| Stuck Float | Improper Filling |
| Corrosion | Weak Valve |
| Unusual Noises | Sealing Issues |
| Blocked Fill Tube | Slow Filling |
By following these tips, you can ensure your toilet fill valve is in good condition. Regular inspections can prevent major problems. Keep your toilet running smoothly.
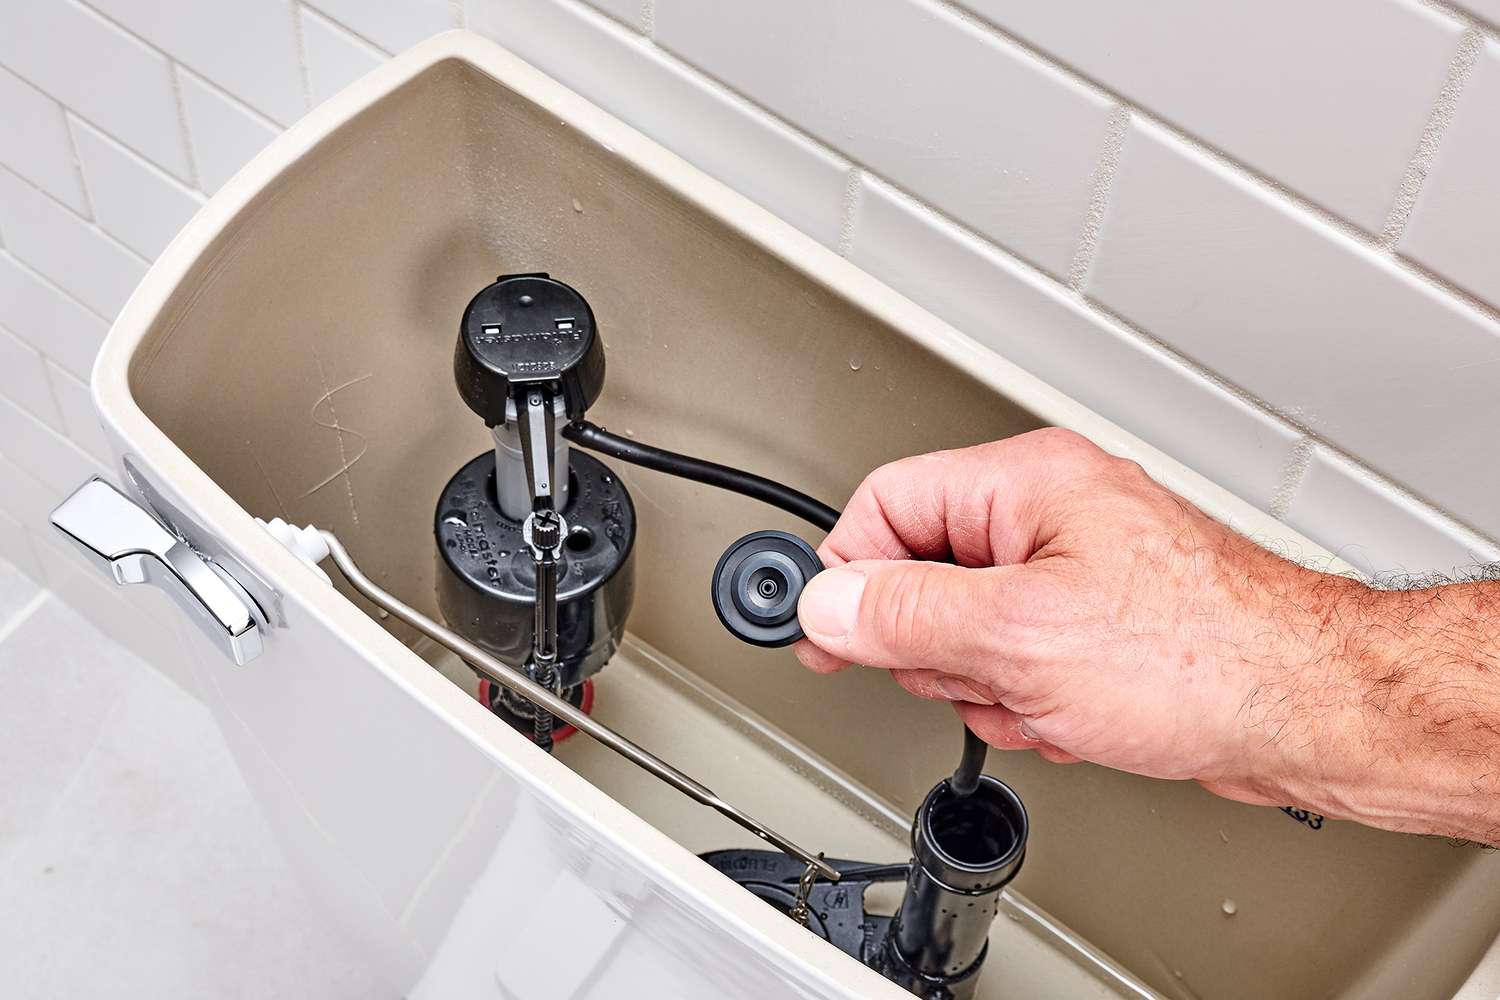
Cleaning The Fill Valve
Is your toilet fill valve not working well? Cleaning the fill valve can solve many problems. A clean fill valve ensures the toilet fills properly. Let’s look at simple steps to clean the fill valve.
Removing Debris
First, turn off the water supply to the toilet. You can find the valve near the wall behind the toilet. Turn it clockwise to stop the water flow.
Next, flush the toilet to empty the tank. Use a sponge or towel to soak up any remaining water. This makes it easier to handle the fill valve.
Now, locate the fill valve inside the tank. Remove the cap by turning it counterclockwise or lifting it up. Look for any visible debris or dirt around the valve.
Remove any large debris with your hands. Be careful and gentle to avoid damaging the valve parts.
Cleaning Techniques
To clean the fill valve thoroughly, you will need some tools. A small brush, like an old toothbrush, works well. You might also need a bowl of warm soapy water.
Use the brush to scrub the fill valve gently. Pay special attention to small openings and crevices. Dip the brush in soapy water to help remove grime.
For stubborn dirt, you can use a toothpick. Gently poke it into tiny holes to clear any blockages.
Once you clean the fill valve, rinse it with clean water. Ensure all soap and debris are washed away.
Reassemble the fill valve by replacing the cap. Turn the water supply back on by turning the valve counterclockwise.
Flush the toilet to test if the fill valve works properly. If the water fills the tank smoothly, you have done a great job!
| Step | Description |
|---|---|
| 1 | Turn off the water supply |
| 2 | Empty the tank |
| 3 | Remove visible debris |
| 4 | Scrub with a brush |
| 5 | Rinse and reassemble |
Cleaning the fill valve is easy and keeps your toilet working well. Remember to check for debris regularly. This will help maintain a smooth and efficient toilet system.
Credit: www.finehomebuilding.com
Adjusting The Fill Valve
Adjusting the fill valve in your toilet can solve many common issues. This guide will help you make the right adjustments. Follow these steps to ensure your toilet functions properly.
Height Adjustment
The height adjustment ensures the fill valve is set correctly. This step is crucial for proper water level.
- Turn off the water supply to your toilet.
- Flush the toilet to empty the tank.
- Locate the adjustment screw on the fill valve.
- Turn the screw clockwise to lower the valve.
- Turn the screw counterclockwise to raise the valve.
Check the water level mark on the inside of the tank. Adjust until the water level is correct.
Float Adjustment
The float adjustment controls how much water fills the tank. This step prevents overflow and ensures efficient flushing.
- Identify the float on the fill valve.
- Check if it is a ball float or a cup float.
- For a ball float, bend the arm to adjust the height.
- For a cup float, use the adjustment clip or screw.
- Raise the float to increase the water level.
- Lower the float to decrease the water level.
Test the toilet by flushing and observing the new water level. Make further adjustments if necessary.
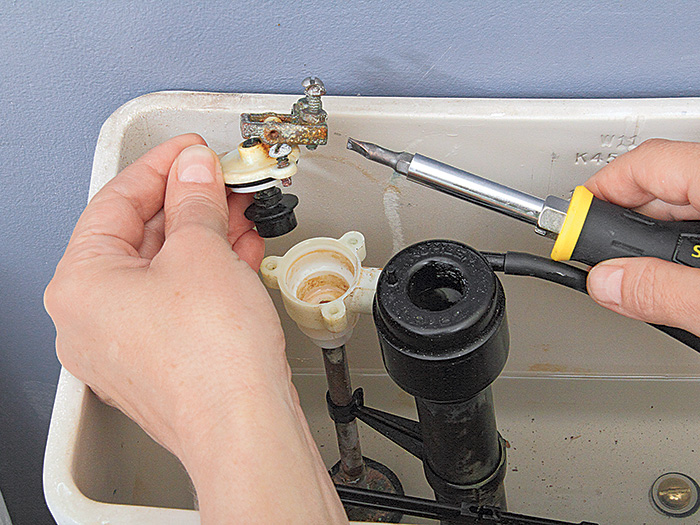
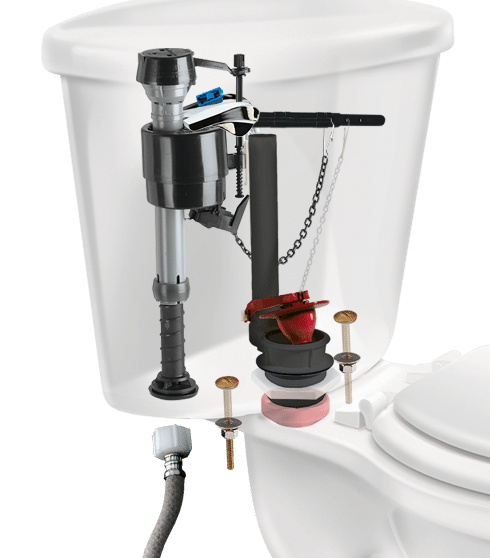
Replacing The Fill Valve
Is your toilet making strange noises? Does it take a long time to refill? It might be time to replace the fill valve. This simple repair can save water and improve toilet performance. Follow this guide to get your toilet running smoothly again.
Removal Process
First, turn off the water supply to the toilet. Locate the shut-off valve behind the toilet and turn it clockwise. Flush the toilet to empty the tank. Use a sponge or towel to soak up any remaining water.
Next, disconnect the water supply line from the bottom of the tank. Use an adjustable wrench to loosen the nut. Place a bucket or towel under the tank to catch any water.
Inside the tank, locate the fill valve. It’s usually on the left side. Use a wrench to remove the nut holding the fill valve in place. Lift the fill valve out of the tank.
Installation Steps
Start by placing the new fill valve into the hole in the tank. Adjust the height of the fill valve if needed. Most fill valves have an adjustable stem. Make sure the top of the valve is about one inch below the tank’s top edge.
Secure the fill valve with the locknut. Tighten the nut with a wrench, but don’t overtighten. Reconnect the water supply line to the bottom of the fill valve. Use your hand to tighten the nut, then give it a quarter turn with a wrench.
Attach the refill tube from the fill valve to the overflow pipe. This tube directs water into the bowl after flushing. Turn the water supply back on by turning the shut-off valve counterclockwise.
Test the new fill valve by flushing the toilet. Make sure the tank refills properly and there are no leaks. Adjust the water level if needed. Most fill valves have an adjustment screw or clip.
Enjoy your newly fixed toilet! A properly working fill valve can save water and prevent future issues.
Credit: www.fluidmaster.com
Preventative Maintenance Tips
Maintaining your toilet’s fill valve is essential for a smooth operation. Implementing some simple preventive measures can save you from unexpected repairs. Follow these tips to ensure your fill valve remains in top condition.
Regular Inspections
Conduct regular inspections to catch issues early. Look for signs of wear or damage. Inspect the valve every few months to ensure it functions correctly.
- Check for leaks around the valve.
- Ensure the float moves freely.
- Listen for unusual noises.
Addressing minor problems promptly can prevent major issues later.
Prolonging Valve Lifespan
To prolong the lifespan of your fill valve, follow these tips:
- Clean the valve periodically. Remove any sediment or debris that may accumulate.
- Adjust the float to maintain the correct water level. This helps avoid unnecessary strain on the valve.
- Replace worn parts promptly. If you notice any wear, swap out the parts before they fail.
These steps can significantly extend the life of your fill valve.
| Task | Frequency |
|---|---|
| Inspect for leaks | Every 3 months |
| Clean valve | Every 6 months |
| Adjust float | As needed |
| Replace worn parts | Immediately when noticed |
By following these preventative maintenance tips, you can keep your toilet’s fill valve in excellent shape, ensuring a hassle-free experience.

Credit: www.wikihow.com
Frequently Asked Questions
How Do I Know If A Toilet Fill Valve Is Bad?
A bad toilet fill valve causes constant running water, slow tank refill, or unusual noises. Inspect for leaks and improper water levels.
What Causes A Toilet Fill Valve To Stop Working?
A toilet fill valve can stop working due to debris, wear and tear, mineral buildup, or a faulty float mechanism.
What Is The Problem With The Fill Valve On A Toilet Cistern?
A faulty fill valve in a toilet cistern can cause continuous running water, slow refilling, or insufficient water in the tank. Replace or adjust the fill valve to fix these issues.
Why Is There No Water Going To My Toilet Fill Valve?
Check the water supply valve; it may be turned off. Inspect the fill valve for clogs or damage.
Conclusion
Fixing a fill valve can seem daunting, but it’s manageable with the right steps. Proper maintenance ensures your toilet works efficiently. Remember to check parts regularly and replace as needed. Understanding these basics saves time and money. Keep your toilet in top shape with these simple troubleshooting tips.